
How to Make Garden Gates From Branches

Garden gates made of branches are practical and beautiful. These instructions will show you how to make an arched garden gate about 3 ½ to 4 feet high; the instructions assume that you already have a wall or a fence with an opening for a gate.
Building the Gate
-
Measure the opening between the supports that the gate will hang from. Subtract about 8 inches from that to account for the space needed for hinges and latches. This remaining number is how wide your gate will be.
-
Sketch out the lines and dimensions of your gate. Figure out how big every piece of wood needs to be and whether it needs to be flexible enough to bend. Decide how much of an arch you want.
-
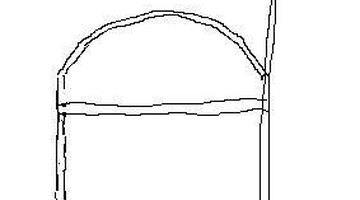
Assemble all the required wood, according to your design, and cut it to the proper length. Cut your horizontal crosspieces to the width of the gate. The gate support branches should be tall enough to reach from the ground to the top of your wall or fence, with enough extra to be able to bend over and reach the opposite gate support branch. (This will form the arch; depending on how much of an arch you want at the top of the gate, allow that much extra height on the branches.)
-
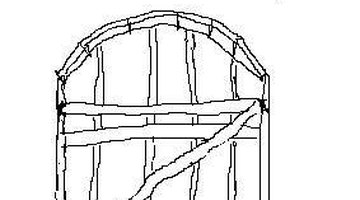
Place the two largest support branches apart, exactly the width of the gate. Nail a horizontal crosspiece to gate support branches about 8 inches from the bottom. Nail a second crosspiece about 1 inch below where you think the wood will begin to bend for the top of the arch. This will give you the outside frame of the gate.
-
Using a 6-inch piece of wire, wrap the support pieces to the crosspieces where they join. Make sure that the wire is wound tightly; you will want to use pliers to ensure the maximum tightness. Cut off any extra length and bend the ends of the wire out of the way.
-
To form the arch, bend the top of the right side support branch over toward the left support branch. When you get it where you want it, wire it in place. Next bend the top of the left support branch toward the right support branch, keeping the branches aligned with each other. Wire the left top to the right support branch and then along the arch about every 3 to 4 inches to hold the arch in place. These branches will arch parallel to each other and will be joined together to form a strong arch. When you are happy with the arch, nail it into place and wire it securely.
-
Add another crosspiece about 6 inches below the top crosspiece, nailing it in place and wiring the joint as above. Add a fourth crosspiece about 6 inches above the bottom crosspiece, again nailing and wiring the joints. If your gate's design calls for additional vertical pieces of wood, add these now, nailing them in place. It is not necessary to wire these.
-
Check for sturdiness of the gate. If it feels flimsy or wobbly, cut a diagonal support branch. Measure from the left joint of the top crosspiece to the right joint of the bottom crosspiece and cut a piece of wood to this length. Nail this long piece of wood diagonally across the gate. You can also nail several pieces of wood diagonally at the top and bottom of the gate.
-
Add any final decorative touches by nailing and wiring them in place. Finish off the gate by making sure that any nail ends that are sticking through the wood are bent over and hammered down so there are no sharp ends sticking out.

Mounting the Gate
-
Placing the bottom of the gate support branches just slightly above the ground, determine where the hinges will need to go on your gate and then mark that spot and the corresponding spot on your support structure. Make sure that the bottom of the gate can swing freely without catching or sticking on the ground.
-
Affix your latch to your support structure and gate. Test the gate and make any adjustments as needed.
-
Apply a weather sealer to the gate to protect it from the elements. Allow the gate to dry and it is ready to use.
Resources
Tips
- Make sure that you bend over and pound down any nails or wire that might be sticking out anywhere. Do not use forsythia as the wood will crack and split when dried, and the gate will not be durable.
Writer Bio
A former Army officer, Beth Anderle has been writing professionally for many years and is an experienced freelance reporter. Anderle graduated from the University of Maine with a Bachelor of Arts in international relations and completed a Master of Divinity from Northern Baptist Theological Seminary. Her areas of interest including gardening, genealogy, herbs, literature, travel and spirituality.
More Articles