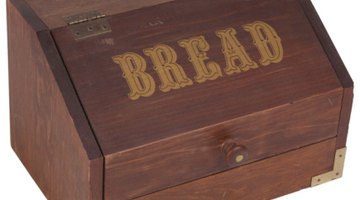
Do-it-Yourself Plans for a Wooden Breadbox
Breadboxes are used for storing bread or cooling bread after it has been baked. They keep bugs, dust and other air particles off of the food while the bread is cut and eaten over time. Breadboxes are often made out of woods like oak, maple and other hardwoods because these woods are durable.

These types of wood will also not affect the flavor of the bread like pine or cedar might. Wooden breadboxes are not complicated to make and can be built in an hour or so at a workbench.
Things You Will Need
- Tape measure
- Pencil
- Straight edge
- 2 oak boards, 3/4 x 9 x 9 inches
- Oak board, 1/2 x 9 x 20 inches
- Oak board, 1/2 x 6 x 20 inches
- Oak board, 1/2 x 10 x 20 inches
- Oak board, 1/2 x 9 1/2 x 20 inches
- Miter saw
- Drill
- Drill bit, 3/32-inch
- Counter-sink, 3/8-inch
- Screw gun
- 12 wood screws, 2-inch
- 2 hinges, 1/2-inch, with screws
-
Lay the 9 x 9 inch board flat. Draw a line from the bottom left corner that ends at the top edge, 3 inches away from the top left corner. Repeat this step with the other 9 x 9 inch board and cut both boards along the lines using your miter saw. These are the ends to your breadbox.
-
Position the ends of your breadbox on their 9-inch edges so the angled cuts are on top. Space the ends 18 ½ inches apart. Position the 1/2 x 9 x 20 inch board against the pair of 9-inch edges and position the 6-inch wide board against the pair of 6-inch edges. The corners of the boards should be flush. Screw the boards to ends by drilling 3/32-inch pilot holes for the screws and 1/4-inch-deep counter-sink holes for the screw heads. Use for screws for each board so four screws enter each of the ends.
-
Lay the ends on the angled edges and set the 10-inch wide board over the edges of the 20-inch boards. Position the board so the corners are flush and screw it to the 20-inch boards using four screws. Drill pilot holes and counter-sink holes, just as you did in the last step.
-
Screw a half-hinge of each hinge to the 1/2-inch wide edge of the 1/2 x 9 1/2 x 20 inch board. Position the hinges so they're each 2 ½ inches away from the ends of the board. The hinges should both be able to fold over the same side of the board.
-
Set your breadbox so it lies flat on the 9-inch wide board. Position the board from the last step over the angled cuts and screw the other pair of half-hinges to the 9-inch wide board on the bottom. The 9 1/2-inch wide board must be able to fold out and away from the box allowing access to the inside.
The Drip Cap
- Breadboxes are used for storing bread or cooling bread after it has been baked.
- Wooden breadboxes are not complicated to make and can be built in an hour or so at a workbench.
- Lay the 9 x 9 inch board flat.
- Position the ends of your breadbox on their 9-inch edges so the angled cuts are on top.
- Screw the boards to ends by drilling 3/32-inch pilot holes for the screws and 1/4-inch-deep counter-sink holes for the screw heads.
References
Writer Bio
Brandon Salo is a world-traveling writer, musician, medical technician and English teacher. After earning his degree at Northern Michigan University, he traveled the world while writing, performing as a jazz pianist and teaching English. In 2014 he worked as an emergency medical technician in New York state before he left to travel the world while finishing his first book.
Photo Credits
- Hemera Technologies/PhotoObjects.net/Getty Images
- Hemera Technologies/PhotoObjects.net/Getty Images
More Articles


