
How to Test a Dryer Thermostat
How to Test a Dryer Thermostat. As durable and long lasting as dryers are, they don't last forever, and at some point, you will have to either troubleshoot your dryer's problems or purchase a brand new one.
I like to at least give it a try and hopefully make my own repairs before shelling out a large sum of money for a new one. So, if you're like me and you want to extend the life of your dryer as long as possible, then you will have to learn some troubleshooting skills. Today we learn how to test a thermostat on a dryer.
Things You Will Need
- Screwdrivers
- Multi-Tester
- Needlenose pliers
-
The first step you must always perform when working on electric is to turn the power OFF to whatever it is you are working on. In the case of a dryer, you can simply unplug the cord from the wall. If it is direct-fed, then you will have to turn the breaker off.
-
A dryer's thermostat is a complex component of the control system. It is actually a number of different thermostats that control the overall temperature. When the dryer's heat gets too high, it has one thermostat that breaks the circuit and allows it to cool down. When the dryer cools to a certain temperature, another thermostat closes the connection and kicks the heat back up. Sometimes, a thermostat will not function at all and the result will be a cold dryer, or one thermostat may stay on regardless of the temperature.
-
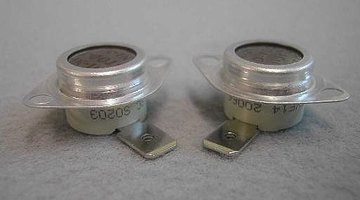
The thermostats are small, oval or disc-shaped components, usually no more than an inch and a half in size. They will have two wires attached to them and they can normally be found under the lint trap, inside the vent line or attached to the blower housing.
-
When you find a thermostat, be sure to remember which wire gets connected to which terminal. Write it down in a notebook or label the wires with tape. This will make it easier to put everything back together later. Use your needlenose pliers to pull the wires off of the terminal posts. The connectors simply slide right off, but be sure to grasp the actual connector and do not tug on the wires!
-
Check the wires for any breaks or signs of corrosion, as that may be reason behind the dryer's problems. If everything looks good, then let's test the thermostat.
-
On your multi-tester, set the tester to read ohms. On many types, the setting is also called RX1 or X1. At room temperature, the thermostat should give off a continuity reading of zero, so touch one probe to one terminal and the other probe to the other terminal and check the tester's display. It should read zero. If it reads infinity, then the thermostat is bad. Simply unscrew it, take it to your local appliance repair shop and purchase a replacement.
-
When you get home with the new thermostat, screw it back into place and reconnect the wires in their proper position. Put everything back together and plug the dryer back in.
-
Test the dryer by turning it on. If the bad thermostat was the only problem, then the dryer should be heating up and you should now be feeling pretty good about yourself for having saved about 400 bucks!
The Drip Cap
- How to Test a Dryer Thermostat.
- I like to at least give it a try and hopefully make my own repairs before shelling out a large sum of money for a new one.
- In the case of a dryer, you can simply unplug the cord from the wall.
- It is actually a number of different thermostats that control the overall temperature.
- When the dryer's heat gets too high, it has one thermostat that breaks the circuit and allows it to cool down.
- When you get home with the new thermostat, screw it back into place and reconnect the wires in their proper position.