How to Make Stair Risers
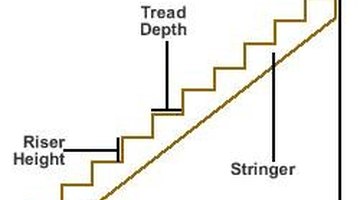
Stair risers are boards that form the vertical element of a stair step. Although not actually required in a set of stairs, they give the stairs a finished look by covering the airspace that would exist between each tread.

Making stair risers is a simple task that can be undertaken by anyone with the ability to measure, make simple cuts with a saw and use a hammer.
-
Measure the rise dimension from the stringers you have made for the stairs. Rip 1x8 lumber pieces to that dimension minus 1/4 inch for the second step on up. The exception will be the bottom riser. Measure the rise from the bottom floor level to the first step, and rip that riser to that height, minus 1/4 inch.
-
Take the ripped 1x8 lumber pieces and cut them all to a length that is the same as the width of the stairs. This is the distance as measured between the outside edges of the outside stringers.
-
Drill pilot holes in the riser boards for nailing the boards to the stringers. Make these holes 1 inch from the top edge and 1 inch from the bottom edge, in line and in position so that you may nail into the stringer behind the riser.
-
Start with the bottom riser; spread wood glue along the stringer where the riser board will make contact with it and nail it to the stringer using cement coated nails in the pilot holes.
-
Attach the second riser in the same fashion as step 3. Apply wood glue to the first tread where it will make contact with the stringers, and nail it to the stringers in three places with cement coated nails, at least 1 inch from the edges of the tread to prevent splitting. Attach the third riser, then the second tread, and continue in this manner until all risers are installed.
Things You Will Need
- Measuring tape
- 1x8 lumber in a length equal to the total width of the stair steps (width X number of steps)
- Circular saw
- Electric drill
- Hammer
- Cement coated nails
- Wood glue
Tip
Be sure to check all local codes for stairs, they can be very strict and specific.
References
Writer Bio
Anthony Smith began writing for Demand Studios in May of 2009 and has since written over 1400 articles for them. He also writes for "The College Baseball Newsletter." He attended the University of New Mexico, and has more than 25 years of experience in the business world.
Photo Credits
- http://www.atticconversioncentre.com.au/images/riser_diag.jpg, http://www.renovationexperts.com/images/decks/stair-stringer.jpg
- http://www.atticconversioncentre.com.au/images/riser_diag.jpg, http://www.renovationexperts.com/images/decks/stair-stringer.jpg
More Articles


