
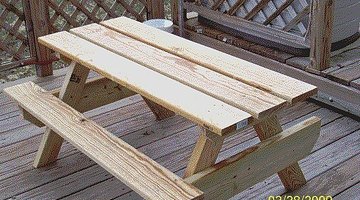
How to Build a Kids Picnic Table Plans
These how to build a kids picnic table plans are free and will give you the knowledge you need for cutting all of the pieces, finishing the wood (for indoor or outdoor use) and assembling a beautiful picnic table for your kids to enjoy. And it's really fun to get the kids involved.
They may not be able to do the cutting or drilling but they sure can help you with the sanding and finishing. You could even allow them to select the wood or finishing projects as part of this how to build a kids picnic table plan.
Things You Will Need
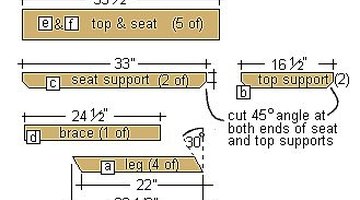
- a. Legs: 4 pcs 1 X 3 X 23 1/2" long, with 30degree cuts from both ends
- b. Table Supports: 2 pcs 1 X 3 X 16 1/2" long, with optional decorative 45 degree cuts from both ends
- c..Seat Supports: 2pcs 1 X 3 X 33" long, with optional decrotive 45 degree cuts from both ends
- d. Brace: 1 Pc 1 X 3 X 24 1/2" long
- e. Table Top: 3 pcs 1 X 6 X 35 1/2" long
- f. Seats: 2 pcs 1 X 6 X 35 1/2" long
- Screws various 4 1/2" wood screws and 1 1/2" wood screws
- Wood Glue
- Tools
- Stain Varnish or Paint
-
How to Build a Kids Picnic Table Plans, Cut All Pieces: The first step in this plan is to cut all of the pieces needed per the items needed list. The leg angle cuts are an important part of your table's support system so be sure to mark the angles clearly before cutting. And remember the other angle cuts are decorative and optional so if you choose not to do those cuts it's not a structural problem.
-
How to Build a Kids Picnic Table Plans, Finish The Wood: I know there are some of you who just want to skip this step and move striaght to assembling your kids picnic table but a job done right is a job done well and it is easier to finish the individual pieces than to finish the whole kids picnic table once it's assembled. A light sanding will help your wood to absorb the stain and add a finished look, so sand, stain and add the polyurethane each piece on both sides and ends. Even if you choose to paint your pieces you will want to do the light sanding. The choice is yours but be sure to choose the appropriate products for indoor or outdoor use and remember it's a kid's table so the finish needs to be easy to clean.
-
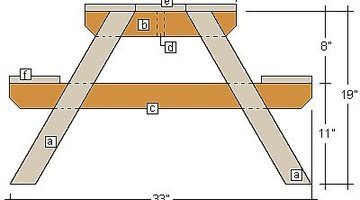
How to Build a Kids Picnic Table Plans, Assembly: On a flat surface lay the first set of table supports and seat supports flat on the ground, lay the legs in place on top of them and match the dimensions and layout on the diagram and screw them together using the 4 1/2" wood screws, then repeat with the second set.
-
Stand the two frame assemblies up and screw the brace in the center of the end frames flush to the top with (2) 1 1/2" wood screws.
-
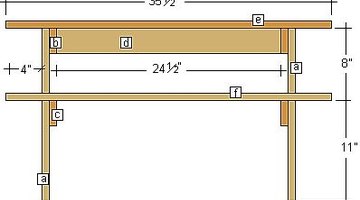
Set the remaining boards in place (one seat per side and three top boards) centered on the supports, and screw them to the support pieces using 1 1/2" wood screws at each meeting of board and support.
Tip
Gluing all of the joints before screwing them together adds strength to your kids picnic table Predrilling the screw holes will help to prevent splitting
The Drip Cap
- These how to build a kids picnic table plans are free and will give you the knowledge you need for cutting all of the pieces, finishing the wood (for indoor or outdoor use) and assembling a beautiful picnic table for your kids to enjoy.
- Set the remaining boards in place (one seat per side and three top boards) centered on the supports, and screw them to the support pieces using 1 1/2" wood screws at each meeting of board and support.
Writer Bio
This article was written by PocketSense staff. If you have any questions, please reach out to us on our contact us page.
More Articles