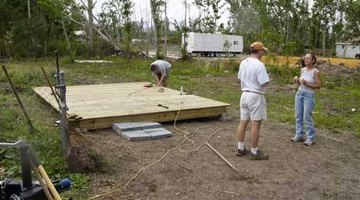
How to Build a 6' x 6' Deck
Building a deck is a fun outdoor project but it can also be daunting. Setting the concrete footings, leveling the frame and correctly installing the decking can be difficult. If you have an itch to build a deck but you're not sure how ready you are for such a project, try starting out with a small one.

This plan is for a deck that sits just off the ground and is big enough for two chairs. It uses the same structural principles as full-sized decks.
Things You Will Need
- Tape measure
- Pencil
- Four wooden stakes
- String
- Snapline
- Post-hole digger
- Four bags of concrete
- Wheelbarrow
- Circular saw
- Four circular cardboard forms for concrete footings, 1 foot in diameter and 6 inches deep
- Four 4x4 galvanized post anchors (made to embed in wet cement and provide a raised box for the posts to sit on)
- Two 8-foot 4x4 pressure-treated posts
- Eight 8-foot 2x8 pressure-treated boards
- Eighteen 8-foot 1x4 pressure-treated decking boards
- Eight joist hangers
- Drill gun
- 3-inch galvanized screws
- 1-1/2 inch galvanized decking screws
Warning
Wear eye protection when using power tools.
-
Use wooden stakes and string to outline where your deck is going to sit, setting up a 6-by-6-foot square. Measure the square from corner to corner and adjust until all the measurements are the same.
-
Dig post holes in each corner of the square, about a foot down and less than a foot wide, just inside the lines. Set your circular cardboard forms at the top of each hole. Mix your concrete in your wheelbarrow, and pour it into the holes, letting it rise to the tops of the circular forms. Set your galvanized post anchors on the surface of the wet cement, with the anchoring rod sticking down into the cement and the 4x4 box sitting on top. Let the concrete set for 24 hours.
-
Use your circular saw to cut your two 8-foot 4x4s in half, giving you four at 4 feet. Set the posts in the footing brackets, securing each of them there with 3-inch galvanized screws while holding the level to them.
-
Use your level and snapline to mark a level line around all four posts just above the cement footings. Affix 2x8s around the perimeter of the four posts, with the bottom edges of the boards at the snapline. Screw them into the posts with your screw gun and 3-inch screws, putting four screws at the end of each board into the post behind it. Cut the boards so that they butt up to each squarely outside each post.
-
Cut the tops of the posts level with the top edges of the 2x8s.
-
Mark straight lines on the top edge of the 2x8s every 18 inches on two sides of the square, setting the position for your four joists. Cut four 2x8s for the joists to size. They will be around 6 feet each, but adjust according to the actual measurements you're coming up with. Affix the joists to the perimeter boards at the four lines, securing them with four 3-inch screws driven in from the face of the perimeter boards. Go back and install joist hangers where each joist meets the perimeter boards.
-
Mark the tops of the perimeter boards on both sides for your decking, running it perpendicular to the joists and leaving a 1/2-inch space between each board. Affix the decking to the joists and perimeter boards with 1-1/2-inch decking screws. Don't try to cut each decking piece to size, but install them so they all run long on both sides.
-
Snap a line to run perpendicular to all the decking boards on each side, a 1/2 inch out from the outer edge of the perimeter boards, and cut the line with your circular saw.
The Drip Cap
- Building a deck is a fun outdoor project but it can also be daunting.
- Setting the concrete footings, leveling the frame and correctly installing the decking can be difficult.
- Affix 2x8s around the perimeter of the four posts, with the bottom edges of the boards at the snapline.
- Affix the joists to the perimeter boards at the four lines, securing them with four 3-inch screws driven in from the face of the perimeter boards.
- Don't try to cut each decking piece to size, but install them so they all run long on both sides.
Photo Credits
- http://waylandtowaveland.org/news/0605Visit_News.htm
- http://waylandtowaveland.org/news/0605Visit_News.htm
More Articles


