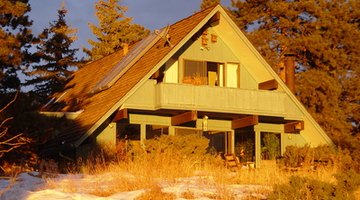
How to Build a Small A-Frame Cabin
A-frame cabin construction is ideally suited for areas that receive a heavy accumulation of snow. The steep roof design of the cabin allows the snow to slide off the roof, rather than accumulating and creating a heavy weight load that can damage or break other roof designs.

Building an A-frame is an easy project for the experienced do-it-yourself home-builder. An A-frame provides space to build a large loft, expanding the use of the structure. The loft offers the cabin considerably more usable space than a single-story cabin built on the same-sized foundation.
Things You Will Need
- Hammer
- Nails
- Screwdriver
- Wood screws
- 5/8-inch pressure treated plywood
- 2-by-8-inch pressure treated lumber
- 2-by-4-inch spruce studs
- Insulation
- Plastic sheeting or tar paper
- Hand saw
- Circular saw
- Joist hangers
- Windows
- Door
- Weatherproof caulking
- Roofing materials (metal sheeting, wood or composition shingles)
- Concrete blocks, foundation stone or four-way deck blocks
- Gravel
Tip
The use of salvaged or recycled materials will save on construction costs and add rustic charm to your A-frame cabin.
-
Clear and level the cabin building site. Remove trees, rocks, roots and any other building obstacles from the site. Secure a building permit if required. Draw out a sketch of your building design to determine the amount of lumber and other building materials required.
-
Build the cabin foundation from concrete blocks, foundation stone or four-way deck blocks. Set the foundation blocks or stone on a 8- to 10-inch layer of level, compacted gravel.
-
Build the floor frame from 2-by-8 pressure-treated lumber set on 16-inch spacing. Nail the floor joists together using joist hangers and 2-inch spiral shank nails. Position the frame in place on the foundation. Cover the floor frame with 5/8-inch pressure-treated plywood. Secure the plywood to the floor joists with nails or wood screws positioned no farther than 8 inches apart.
-
Build the A-frame for the roof from 2-by-8 pressure-treated lumber, using 16-inch spacing. Nail the joists together with joist hangers and 2-inch spiral shank nails. Make sure all measurements are true. If the A-frame is not built with precision, the cabin will settle and construction problems may appear.
-
Position the roof frame squarely on the cabin foundation and secure by nailing to the floor joist with 2-inch spiral shank nails driven at a 30 degree angle. Cover the roof joist with 5/8-inch pressure-treated plywood secured with nails or wood screws placed no more than 8 inches apart. Cover the plywood with weatherproof plastic sheeting or tar paper. Nail or staple the covering to the plywood and tape the ends.
-
Build the two end wall frames from 2-by-4 spruce lumber set on 16-inch spacing. Position the cabin door and windows to allow for cross ventilation. When the wall frames are built, raise them one at a time and secure by nailing them to the roof and floor joists with 2-inch spiral shank nails. Cover the exterior of the wall frame with treated 5/8 inch plywood. Cover the plywood with tar paper or plastic sheeting prior to finishing with wood shingles or siding.

The Drip Cap
- A-frame cabin construction is ideally suited for areas that receive a heavy accumulation of snow.
- The steep roof design of the cabin allows the snow to slide off the roof, rather than accumulating and creating a heavy weight load that can damage or break other roof designs.
- The loft offers the cabin considerably more usable space than a single-story cabin built on the same-sized foundation.
- Clear and level the cabin building site.
- Secure a building permit if required.
- Build the floor frame from 2-by-8 pressure-treated lumber set on 16-inch spacing.
References
Writer Bio
A passionate writer for more than 30 years, Marlene Affeld writes of her love of all things natural. Affeld's passion for the environment inspires her to write informative articles to assist others in living a green lifestyle. She writes for a prominent website as a nature travel writer and contributes articles to other online outlets covering wildlife, travel destinations and the beauty of nature.
Photo Credits
- a frame image by Earl Robbins from Fotolia.com
- a frame image by Earl Robbins from Fotolia.com
- Old Barn Wall over Stone Foundation image by steverts from Fotolia.com
More Articles


