How to Fix an Electric Oven That Heats Poorly
If your oven won't get up to temperature or leaves your food half-cooked, it's likely that either the thermostat needs to be adjusted or one of the elements has gone bad. Both fixes take little more than a screwdriver and a few minutes of your time.

Things You Will Need
- Replacement Oven Element
- Masking Tape And Pen
- Oven Thermometer
- Nut Driver And Socket
- Phillips And Flathead Screwdrivers
Tip
If you find it hard to reach to the back of the oven, lift off the oven door. Oven still won't work? Ask a professional to check the oven-door safety switch. A faulty switch can prevent the oven from heating.
-
Place an oven thermometer inside the oven and shut the door.
-
Turn on the oven, set it for 350°F (180°C) and let it heat for 30 minutes.
-
Check the thermometer. Most thermostats are accurate to within 25°F (14°C). If yours is off by more than 50°F (28°C), the thermostat is bad and you will need to have a professional replace it. If your thermostat is off by less than 50°F (28°C), adjust the thermostat.
-
Locate the adjustment screw. On some thermostats, the adjustment screw is on the back of the thermostat knob; on others it's inside the thermostat shaft.
-
To make a temperature adjustment on the back of a knob, remove the knob and loosen the retaining screws on the back, using a Phillips screwdriver. Turn the center disk toward "Hotter" or "Raise" to increase the temperature, or toward "Cooler" or "Lower" to decrease the temperature. Tighten the screws, reinstall the knob and test the oven. Readjust the knob if necessary.
-
To make a temperature adjustment inside the shaft, remove the knob and slip a thin flathead screwdriver into the knob until it engages the adjustment screw in the bottom. Turn the screwdriver clockwise to raise the temperature, counterclockwise to lower it. Each quarter-turn will move the temperature about 25°F (14°C). When you're done, reinstall the knob and test the oven. Readjust the temperature if necessary.
-
Identify the bad element. Set the oven to broil and check the upper element. Then turn it to bake and check the lower one. Both elements should turn bright orange if they're operating correctly. If one is cold, it needs to be replaced. If they both seem to heat up, look for signs that one is damaged. It may appear to be melted in one spot, or one spot may not turn as bright a color as other parts.
-
Turn off power to the oven at the circuit-breaker panel, leave the oven door open, and let the oven sit until the elements are cool to the touch.
-
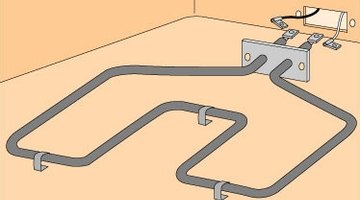
Loosen the bad element. Use a screwdriver or a nut driver and socket to remove the screws that hold the element-support bracket to the oven's back wall. Slip the element out of the brackets that hold it in place, and pull it forward until you can access the wiring (see illustration).
-
Disconnect the wiring. Wrap each wire with masking tape, and label them so you can install the new element correctly. Then unscrew the element from its wiring.
-
Take the element to an appliance store and buy a replacement.
-
Install the new element. Screw the element to its wiring, slip the element into its brackets, and screw the element-support bracket to the back of the oven.
-
Turn on the power and test the new element.
The Drip Cap
- If your oven won't get up to temperature or leaves your food half-cooked, it's likely that either the thermostat needs to be adjusted or one of the elements has gone bad.
- If your thermostat is off by less than 50°F (28°C), adjust the thermostat.
- Turn the screwdriver clockwise to raise the temperature, counterclockwise to lower it.
- Readjust the temperature if necessary.
- Set the oven to broil and check the upper element.
- Use a screwdriver or a nut driver and socket to remove the screws that hold the element-support bracket to the oven's back wall.
Writer Bio
This article was written by PocketSense staff. If you have any questions, please reach out to us on our contact us page.
More Articles


