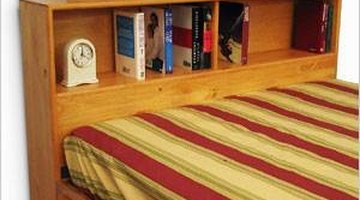
How to Build a King Size Bookcase Headboard
If you who like to curl up in bed with a good book, a bookcase headboard is ideal. When you finish one book there is another waiting for you within reach.

Things You Will Need
- One piece of 1-by-12-by-78-inch solid oak
- One piece of 1-by-12-by-74½-inch solid oak
- Two pieces of 1-by-12-by-44-inch solid oak
- One piece of 1-by-12-by-24½- inch solid oak
- Two pieces of 1-by-12-by-13¼-inch solid oak
- One piece of 44-by-78-by-1/4-inch oak plywood
- Measuring tape
- Carpenter's square
- Variable speed drill
- 1/16-inch drill bit
- 1/16-inch countersink drill bit
- Philips head screw tip
- Wood glue
- 1½-inch drywall screws
- 2d common nails
- Wooden screw hole buttons
-
Place the two 44-inch pieces of oak side by side on a table. Measure down from the top of one and make a mark at 13¼-inches. Place the carpenter's square on the mark and draw a line across the oak. Next, measure ¾-inch down from that line and make a mark. Place the carpenter's square on that mark and draw a line across the oak. Repeat this process for the other 44-inch piece of oak. This is where the 74½-inch piece of oak will go. Drill pilot holes between these two lines and 2-inches in from the edge with the 1/16-inch drill bit.
-
Place the 74½-inch piece of oak on a table. Measure and mark the center (37¼-inches). Next, measure 12 inches out from that mark in both directions and make a mark. Measure ¾ inch out from each of those marks. Place the carpenter's square on these marks and draw the line across the oak. Drill pilot holes between these two lines and 2-inches in from the edge with the 1/16-inch drill bit.
-
Place the 78-inch piece of oak on a table. Measure and mark the center of it (39 inches). Next, measure 12 inches out from that mark in both directions and make a mark. Measure ¾ inch out from each of those marks. Place the carpenter's square on these marks and draw the line across the oak. Then make a mark 1 inch from each end. Place the carpenter's square on your marks and draw a line across the oak. Make a mark ¾-inch inside that mark and draw a line across the oak. Drill pilot holes between the lines and 2 inches in from the edge with the 1/16-inch drill bit.
-
Turn the pieces of oak from Steps 1-3 over. Drill a countersink hole in each of the holes that you have drilled thus far. Be certain to allow enough depth for the wooden screw hole buttons which will be installed at the end of this project.
-
Run a bead of glue between the lines you drew on the 74½-inch piece of oak from Step 2. Stand it up on its long edge and place one of the 13¼-inch pieces of oak between the lines and on the glue. Secure these two pieces together with the drywall screws. Repeat this process for the other 13¼-inch piece of oak. Be sure to clean up excess glue immediately with a damp cloth.
-
Place the assembly from Step 5 between of the two 44-inch pieces of oak from Step 1. Align the 74½-inch piece with the lines that you drew in Step 1. Be certain to apply some glue to the edges during this process. Secure the three pieces together with the drywall screws.
-
Apply some glue to all of the edges that are exposed at the top of the headboard. Place the 78-inch piece of oak at the top and align all the adjacent pieces to the lines that you marked earlier. Secure these with the drywall screws. Apply glue to all the exposed edges on the back of the headboard and place the 44-by-78-by-1/4-inch oak plywood on it. Be certain to turn the finished side of the plywood to the inside of the headboard. Secure this plywood to the headboard with the 2d nails.
Tip
Install the screw hole buttons by applying glue and gently tapping the button in place. Clean any excess glue immediately with a damp cloth. Draw lines lightly.
Warning
Do not apply too much pressure as you drill, as this will cause splinters.
Do not remove splinters from drilling without wearing gloves.
Do not apply any finish to headboard in an unventilated area.
The Drip Cap
- If you who like to curl up in bed with a good book, a bookcase headboard is ideal.
- Place the two 44-inch pieces of oak side by side on a table.
- Next, measure ¾-inch down from that line and make a mark.
- Drill pilot holes between these two lines and 2-inches in from the edge with the 1/16-inch drill bit.
- Place the carpenter's square on these marks and draw the line across the oak.
- Drill a countersink hole in each of the holes that you have drilled thus far.
- Run a bead of glue between the lines you drew on the 74½-inch piece of oak from Step 2.
- Secure the three pieces together with the drywall screws.
- Apply some glue to all of the edges that are exposed at the top of the headboard.
Resources
Writer Bio
Michael Straessle has written professionally about the construction industry since 1988. He authored “What a Strange Little Man,” among other books, and his work has appeared in various online publications. Straessle earned a Bachelor of Arts from the University of Arkansas at Little Rock in professional/technical writing.
Photo Credits
- http://www.gothiccabinetcraft.com/images/catalog/product/head_boards_img_0594.jpg
- http://www.gothiccabinetcraft.com/images/catalog/product/head_boards_img_0594.jpg
More Articles


