
How to Fix a Sagging Roof Line
Straighten out your old house's sagging roof and get rid of those cracks in the wall with these easy to follow steps.
Things You Will Need
- 2x4's
- hammer
- drill
- screws
- jacks
- string line
- level
- line level
- sledge hammer
-
The first step is to the basement first. Check the ceiling for sagging by attaching a string on one end of the beam and run it along the bottom edge of the beam. If the line does not continually follow the bottom of the beam and the bottom of the beam is below the line, the beam is sagging. Use instructions from my page "How to fix a sagging floor" before you continue trying to fix the roof sagging issue. http://www.ehow.com/how_5792544_fix-sagging-floor.html
-
After your floor is straight, it is time to concentrate on the next floor's ceiling. Screw a 2x4 about 12" long with a small nail sticking out on the 1 1/2" side. This will be the bottom of your board. Screw it into the wall and repeat this on the opposite wall. Run your string line from the nails and measure up from the string. If the measurement gets smaller by more than 2", mark the spot on the ceiling. Mark the worst spot with a "X" with a circle around it. Now go upstairs and repeat this step. If your measurements are within 1/4" of each other between floors, then you can brace both floors at the same time.
-
Now, use a stud finder to find the ceiling joists. Mark them, and screw in a 2x4 where the sag is perpendicular to the direction of the sag in the ceiling and then another on top of it. This may take a few different 2x4's as there may be multiple areas where the ceiling sags. Place a jack post or bottle jack with a post underneath it. Using your lines as a reference, jack the ceiling up 1 full turn (1/4"). YOU MAY ONLY GO 1/4" PER DAY OR JOISTS WILL CRACK OR BREAK!!! Once you have reached the desired height, go into your attic and add extra joists on every other ceiling joist. Nail or screw the joists directly to the original joists. The add on joists, or sister joists, should extend as close as you can get to the same length of the original joists and, if possible, be 2x8 or larger framing members. If you have a two story home, you will have to remove the drywall or plaster in order to perform this. You will be adding sisters to a floor from below and to every floor joist. The sister joists will have to be the same or slightly smaller height of the floor as it will have to be refinished with drywall. For instructions on how to properly install and finish drywall, go to the link below. http://www.ehow.com/how_5841970_properly-install-drywall-yourself.html
-
DO NOT TAKE ANY OF THE SUPPORTS DOWN UNTIL YOU HAVE DONE STEP 4
-
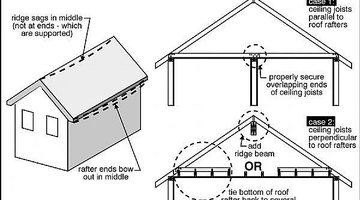
Now go outside and stand back from your house. If you do not notice a difference in the roof line, then you need to do some extra work. First, perform step 2 except keep the string under your beam and off to the side a bit to make room for some framing. Once you have established how much the roof sag needs to be jacked up, lay a 2x4 plate across the ceiling joists and nail directly under the ridge of the roof. Now add collar ties from one side of the rafter to the other. If these already exist, nail a 2x4 to them directly under the 2x4 plate you nailed down before. Now take your jack and jack up the ridge. You may do this 1" per day and roof rafters can handle more stress. Jack up until level, the frame a wall 16" on center between the 2x4's that will serve as the top and bottom plate. Use the link below for wall framing instructions. http://www.ehow.com/how_5789527_frame-simple-wall.html
-
Now you can finally unscrew and remove the temporary plates and take down all the string lines.
-
Congratulations! You roof line is now straight and your floors are as well!
Tip
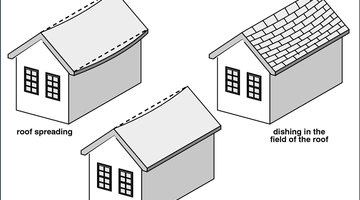
If your rafters are still sagging a bit and it is causing your roof to dish out a little in the center of the roof sides, add a 2x4 that goes all the way across the rafters in the center of the length of the rafters. Use your string line to determine how much the roof need to go up. Then put a temporary plate on top of the ceiling joists and jack up to height. Add 2x4s from the rafters to the ceiling joists for permanent support.
Warning
This project requires heavy lifting and overhead work on a ladder.
The Drip Cap
- Straighten out your old house's sagging roof and get rid of those cracks in the wall with these easy to follow steps.
- Run your string line from the nails and measure up from the string.
- YOU MAY ONLY GO 1/4" PER DAY OR JOISTS WILL CRACK OR BREAK!!! The add on joists, or sister joists, should extend as close as you can get to the same length of the original joists and, if possible, be 2x8 or larger framing members.
- http://www.ehow.com/how_5841970_properly-install-drywall-yourself.html DO NOT TAKE ANY OF THE SUPPORTS DOWN UNTIL YOU HAVE DONE STEP 4 Now go outside and stand back from your house.
- If you do not notice a difference in the roof line, then you need to do some extra work.
- Once you have established how much the roof sag needs to be jacked up, lay a 2x4 plate across the ceiling joists and nail directly under the ridge of the roof.
- Jack up until level, the frame a wall 16" on center between the 2x4's that will serve as the top and bottom plate.
Writer Bio
This article was written by PocketSense staff. If you have any questions, please reach out to us on our contact us page.
More Articles