


By building a simple platform and then attaching it to the ceiling structure using a pulley system, adequate storage is created in an out of the way location, but is also conveniently accessed when needed.
Things You Will Need
Build the Platform
-
Measure and cut the 2-by-4 lumber to the lengths required for your storage platform. For a simple 4-by-8 rectangular platform, the two longer pieces will be 8 feet long while the shorter support pieces will be 3 feet 9 inches. The measurement for the shorter support pieces has been reduced to take into account the additional 3 inch depth of the two long pieces -- a 2-by-4 is actually 1.5 inches by 3.5 inches, so the two long 2-by-4s would add a total of 3 inches to the size of the platform.
-
Cut two 2-by-4's to 8 feet long, and five 2-by-4's to 3 feet 9 inches long. Using 3 inch wood screws, attach the 8 foot long pieces to the ends of the shorter support pieces. You should use two screws at each end of the shorter pieces, for a total of 20 screws.
-
Attach one sheet of 4-by-8 1/2 inch plywood to the top of the wood frame. Use 1-1/2 inch wood screws at 12 inch intervals along each of the 2-by-4 supports.
-
Screw an eye bolt into each corner of the platform. A total of 4 eye bolts are needed for the platform. These bolts have wood screw threads on one end, and steel loop on the other, allowing the attachment of the anchor rope.




Install the Pulley System
-
Screw an eye bolt into the ceiling structure at each end of the location where the storage unit will be installed. The bolt should be securely threaded into a ceiling joist or rafter, not just into the drywall ceiling.
-
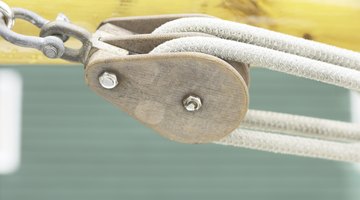
Attach the pulleys to these eye bolts using a short length of chain.
-
Install a tie-off bracket at chest level on the wall at each end of the location where the storage unit will be installed. This will be used to secure the rope while the unit is aloft.
-
Install lengths of chain to each of the eye bolts on the platform. Connect the chains with a steel ring.
-
Thread the rope through the pulley and tie it off on the steel ring. Pull down on the rope to raise the platform, then tie it off on the bracket to hold it securely.
The Drip Cap
- In most garages, storage space is at a premium.
- By building a simple platform and then attaching it to the ceiling structure using a pulley system, adequate storage is created in an out of the way location, but is also conveniently accessed when needed.
- For a simple 4-by-8 rectangular platform, the two longer pieces will be 8 feet long while the shorter support pieces will be 3 feet 9 inches.
- Thread the rope through the pulley and tie it off on the steel ring.