How to Build Shelf Brackets
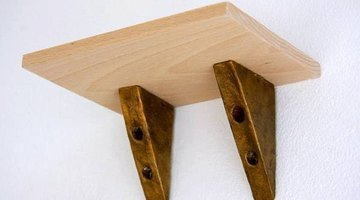
There is an infinite variety of styles when it comes to the brackets that hold up wall shelves. Designers often use ornately shaped brackets to dress up the shelves. However, the one crucial function of a shelf bracket is to hold up the shelf, and sometimes the best design is a simple one.

This is a plan for a basic triangular shelf bracket that looks great in rustic settings such as cabins or outdoor sitting areas.
Things You Will Need
- One 2-inch x 8-inch board of pine or oak, at least 2 feet long
- Level
- Tape measure
- Pencil
- Protective eyewear
- Circular saw
- Power drill
- 1/2-inch drill bit
- 1/8-inch drill bit
- Stud finder
- Long screwdriver drill bit
- 2-inch-long wood screws
Warning
Always wear eye protection when using a circular saw. This shelf is designed to hold lightweight decorative items and shouldn't be used for heavy items. When affixing the shelving to the walls, make sure you aren't above or near any electrical sockets or light switches, as this indicates there are power lines behind the wall.
-
Lay the 2 x 8 on a workbench or other elevated flat surface. Hook your tape measure at one narrow end of the board, at the top corner, and use your pencil to put a mark 8 inches in, putting the mark at the top long edge of the board. Lay the level across the board diagonally, so it extends from your mark, back to the bottom corner at the end. Draw a line along the level to form a triangle.
-
Cut completely across the diagonal line with the circular saw while holding the board out over the edge of your cutting surface. Repeat the process on the other end of the board, so you have two triangular pieces.
-
Lay one of the triangles on its long straight edge, so the angled side that you cut faces up. With your pencil, make two marks on the angled side, evenly spaced from the ends and from each other. With your power drill and 1/2-inch drill bit, drill down at the marks. Don't go all the way down through the other side of the piece, but stop 1 to 2 inches short of it.
-
Switch your drill to the 1/8-inch drill bit. Insert the bit into the 1/2-inch holes you've drilled, and drill down through the rest of the piece and out the other side. (Note: Make sure to hold the piece out over the edge of your workbench, so the drill bit doesn't go down into the surface.) You should be left with two 1/2-inch holes on one side and two 1/8-inch holes on the other side. Repeat the process on the other triangle.
-
With your level and pencil, draw a straight, horizontal line on the wall where you want the bottom of your shelf to go. It's important that it span two studs inside the wall, so your brackets will have something solid to hold onto. If you're not sure where the studs are, use an electronic "stud finder,'' or use a hammer to tap a long nail at different parts of the wall until you hit solid wood. (Note: Once you find one stud, there are generally others at 16 inches on either side. See also the Warnings section below regarding electrical wiring inside the wall.) Then mark two 6-inch-long vertical lines underneath the horizontal line, at the studs, to show where the brackets will go.
-
Put one of your brackets alongside one of the horizontal lines, with the long straight edge against the wall, and the short edge jutting out vertically at the top line. Using your drill and screwdriver bit, drill a wood screw into the top hole. The 1/2-inch upper part of the hole will allow your bit to push the screw down into the 1/8-inch hole. Do the same thing on the lower hole.
-
Repeat the process for the second bracket. The two brackets now are ready to support whatever shelf you want to place there.
The Drip Cap
- There is an infinite variety of styles when it comes to the brackets that hold up wall shelves.
- This is a plan for a basic triangular shelf bracket that looks great in rustic settings such as cabins or outdoor sitting areas.
- Hook your tape measure at one narrow end of the board, at the top corner, and use your pencil to put a mark 8 inches in, putting the mark at the top long edge of the board.
- Draw a line along the level to form a triangle.
- Insert the bit into the 1/2-inch holes you've drilled, and drill down through the rest of the piece and out the other side.
- ( Repeat the process on the other triangle.
- Using your drill and screwdriver bit, drill a wood screw into the top hole.
Photo Credits
- http://www.limoncellogallery.co.uk/pages/ghpaperpics.asp
- http://www.limoncellogallery.co.uk/pages/ghpaperpics.asp
More Articles


