
How to Lay a Brick Circle

Brick walkways and patios lend color and charm to a yard. You want to incorporate an extra touch by laying out a circle pattern as part of the design. With the right tools and some measuring you will find laying bricks in a circle is not difficult.
Things You Will Need
- Landscaping paint
- Shovels
- Hand tamper
- ¾-inch aggregate
- Flexible edging
- 12-inch spikes
- Hammer
- Tape measure
- Chalk line
- Masonry saw or cold chisel and hammer
- Coarse sand
- Rake
- Board
- Mallet
- Fine sand
- Broom
- Hose
-
Prepare the site for the brick surface by outlining the borders with landscaping paint. Expand the diameter of a circular site by two inches for the edge restraints, or add to inches to each side for a rectangular patio.
-
Excavate seven inches of soil from the area within the borders with shovels. Flatten the ground with a hand tamper tool until it is hard and level.
-
Pour in four inches of ¾-inch aggregate fill to prevent the bricks from sinking into the ground. Tamp the rocks until they are wedged snug together. The tamped aggregate will also facilitate drainage from the site.
-
Install flexible edging around the interior border of the site. Use 12-inch spikes and a hammer to secure it to the ground.
-
Use your measuring tape and chalk line to snap lines from the outer corners of eight bricks to the center of the opposite side to form triangles. Cut the bricks along the chalk lines with a masonry saw or cold chisel and hammer.
-
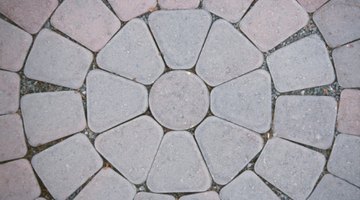
Snap two chalk lines over the vertical and horizontal midpoints of the site to find the center. Place a half brick over the center where the two chalk lines intersect. Lay the eight triangular bricks around the half brick, placing the triangle tips around the center so the wide ends are on the outside. Dry-laying the inner circle enables you to familiarize yourself with the circular pattern without disturbing the sand base.
-
Remove the cut bricks from the aggregate, and lay two inches of coarse sand bedding over the aggregate. Rake the sand until it is level.
-
Draw two midpoint lines in the sand to mark the center. Place the half brick over where the lines intersect, and set the eight bricks around the half brick. Lay a board over the inner circle and hit it lightly all over with a mallet to embed them in the sand.
-
Place whole bricks around the outer edges of the inner circle. The inside corners of the next circle will touch, and there will be more space between the outer corners of the bricks. Continue setting the bricks until a second full circle is laid. Adjust the bricks in the sand so they don’t wobble, then lay the board over sections of bricks and hit it lightly with the mallet.
-
Continue setting the whole bricks, working from the center out. Complete each ring of bricks before moving on to the next outer ring. If the site is rectangular, mark the end bricks with a chalk cut line and trim them as needed.
-
Smooth fine-grained sand over the bricks and pack the sand between the gaps with a broom. Moisten the surface with a hose, and continue adding and packing down sand until the spaces are filled. Sand joints help prevent the bricks from rotating under foot traffic.
The Drip Cap
- Brick walkways and patios lend color and charm to a yard.
- Expand the diameter of a circular site by two inches for the edge restraints, or add to inches to each side for a rectangular patio.
- Flatten the ground with a hand tamper tool until it is hard and level.
- The tamped aggregate will also facilitate drainage from the site.
- Snap two chalk lines over the vertical and horizontal midpoints of the site to find the center.
- Lay a board over the inner circle and hit it lightly all over with a mallet to embed them in the sand.
- Smooth fine-grained sand over the bricks and pack the sand between the gaps with a broom.
References
Resources
Writer Bio
Aurora LaJambre is a writer and editor living in Brooklyn, N.Y. For over five years she's covered topics in culture, lifestyle, travel, DIY design and green living for print and online media. Her publication credits include "WOW Women on Writing," "Six States" and Catalogs.com. She graduated from New York University in 2003 with a Bachelor of Fine Arts in creative writing.
Photo Credits
- Hemera Technologies/AbleStock.com/Getty Images
- Hemera Technologies/AbleStock.com/Getty Images
More Articles