
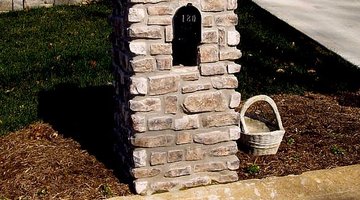
How to Build a Decorative Stone Mailbox
How to construct a decorative stone mailbox.
Tip
If you have no experience in masonry it may be shrewd to read a book on it before attempting to lay stone, however, I've tried to include everything I could think of in this article to do it yourself.
Warning
Wear leather gloves to avoid the lime in the mortar/concrete drying out your skin, wear safety glasses to avoid hurting your eyes. If you get an excessive amount of mortar/concrete on your skin for an extended period of time wash your hands and lather with skin moisturizer to keep your skin from cracking.
-
Dig a hole about two feet deep and to your desired width and length (typically, square).
-
At the top of the hole set a frame (a box made by abutting four pieces of lumber cut to desired length), have the inside measurement of the frame be equal to the desired outside measurement of the mailbox pedestal - make sure it's level horizontally by placing your level at the top of each side of the frame and making adjustments where needed.
-
Mix the concrete as directed and pour it in the hole until full then drag a piece of lumber across the frame in sawing motions to clear away any access concrete and level your base. Tamp the concrete down with a rake until all the rock in the mix settles.
-
Drag a piece of lumber across the frame in sawing motions to clear away any access concrete and level your base.
-
After the concrete begins to thicken (typically 15 minutes to half an hour) skim over the concrete with a concrete trowel until the surface is smooth and uniform.
-
Allow one day for the concrete to harden before laying your stone!!!
-
Take four stakes and drive them into the ground at each corner of the concrete base using a hammer or small sledge.
-
Take twine and (using a level) mark out a level line for the top of the mailbox pedestal by running the string around the top of the stakes (you can also pull other lines at desired intervals to help you pace you courses of stone).
-
Use a masonry trowel to set a line of mortar around the perimeter of your base and set your stone into it (as you lay each stone place your level across the top and tap the stones down using your hammer to make sure your courses are level), make sure you cut away any access mortar by running your spade over the sides of the stone, try to have as little mortar between each stone as possible by chipping away irregularity with a chisel or impact hammer.
-
Offset every other course by having one course lay as close to center as possible over the previous one. Pick your stones wisely!!!
-
When you reach the desired height for your the box portion of the pedestal, fill the hollow portion of the existing stone structure with sand leaving about a half inch drop from the top of the stone.
-
Lay Mortar in the recess to bring it level with the stone and set your box into the center of it (to find the center measure from one side of the pedestal to the other and divide by two then mark your center line with a pencil).
-
Now lay the stone around the box until it is completely cased in and you have reached your desired height. You can add a crown by laying large flat stones at the top of your mailbox pedestal.
-
You may want to take a wire brush and a masonry cleaning acid over the stone after you've finished if you have mortar clinging around the stone.
-
After two weeks you can seal off your pedestal to preserve it by coating it with Thompson's masonry sealant using a roller/paint brush. This will also bring out the natural colors in the stone.
The Drip Cap
- How to construct a decorative stone mailbox.
- Use a masonry trowel to set a line of mortar around the perimeter of your base and set your stone into it (as you lay each stone place your level across the top and tap the stones down using your hammer to make sure your courses are level), make sure you cut away any access mortar by running your spade over the sides of the stone, try to have as little mortar between each stone as possible by chipping away irregularity with a chisel or impact hammer.
- Pick your stones wisely!!! This will also bring out the natural colors in the stone.