
How to Texture Stomp & Drag

Textured ceilings have come a long way since the acoustical popcorn first seen in the 1950s. New textures include stomp and drag techniques combing joint compound and bristle brushes. The technique is quick and takes little practice. Benefits of the plaster finishes include lower costs for less-than-perfect drywall installation, and decreasing sound between the upper and lower floors.
-
Move all items out of the room, including furniture, accessories and other decor. Cover the entire floor with drop cloths or plastic tarps. Use masking tape to attach large sheets of plastic together so no areas are left open and uncovered. Cover walls with plastic sheeting. Tape the plastic against the wall surface with blue painter's tape.
-
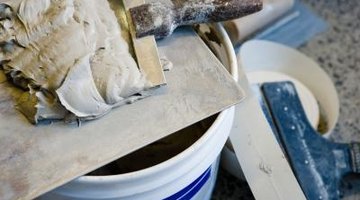
Place a large amount of joint compound onto a drywall hawk. Hold the hawk level with the floor and use it like to a paint palette to hold your material. Scoop away some material using a drywall trowel. Swipe the trowel's edge along the ceiling. Slight trowel marks and ridges are acceptable.
-
Continue to plaster the ceiling. After five to 10 minutes of work, stamp into the wet plaster using a large, round bristle brush. Drag the brush slightly for additional texture or leave as is. Swirling the brush is also an option. Repeat the process until the area is fully plastered and textured. Allow plaster to dry for 24 hours.
-
Paint the plaster with flat paint if desired. Some contractors leave the drywall finish on the ceiling unpainted. However, this makes cleaning difficult. Apply at least two layers of paint for even coverage.
References
- Lowes: Joint Compound Prices
- "Decorative Painting and Faux Finishes"; Sharon Ross; 2005
Tips
- Wash out your bristle brush and trowel often. Keep a five-gallon bucket at your side, with a damp rag. Plaster buildup on your tools dries quickly and will create ridges and scratches in your wet plaster.
Warnings
- Wear a hat or bandana when plastering a ceiling. Though most plaster will stick, a small amount always falls from the surface. Keep windows open for adequate ventilation.
Writer Bio
Julie Hampton has worked as a professional freelance writer since 1999 for various newspapers and websites including "The Florida Sun" and "Pensacola News Journal." She served in the U.S. Army as a combat medic and nurse for over six years and recently worked as the Community Relations Director for a health center. Hampton studied journalism and communications at the University of West Florida.
Photo Credits
- Jupiterimages/Photos.com/Getty Images
More Articles