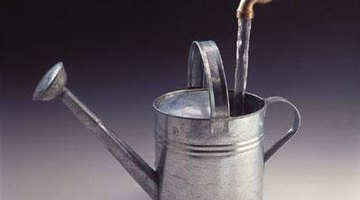
How to Build a Water Can Fountain
If you've seen the magical watering can fountains and wished you had one, but don't want to spend the high dollars needed to make the purchase, here's your chance to own one for half the price. Simply follow these easy instructions, and in no time at all you'll have your own watering can fountain.

This is a simple and impressive DIY project. Use the fountain to dress up your front step, patio or sunroom, or give it as a fun and unique gift.
Things You Will Need
- Galvanized watering can
- Brass spigot
- Table top fountain pump
- Clear 1/2-inch pipe
- Drill
Tip
The can must be galvanized or it will rust. If you are using a used watering can, do a leak test, filling the can to the height at which it will be filled for the fountain. Let the can sit for an hour or two. The length (or height) of the clear pipe depends on the size of the watering can and how far above the can you want your spigot to be "floating." The pipe should be at least 3 inches above the top of the can, but can be higher, depending on personal preference. If you will be using your fountain outdoors, be sure the pump is rated for indoor/outdoor use.
Warning
Do not let your fountain run dry. Running the fountain dry or allowing a low water level can damage the pump. A fountain cord should hang below the plug! This ensures that, should the fountain leak water down the cord, the water will not run into the plug!
-
Drill a hole in the back or side at the top of the watering can. Place the hole in the most unobtrusive spot, depending on how you will have your can displayed. This hole has to be large enough for the plug of the pump to fit through and should be above the maximum water line.
-
Drill small holes in three rows around the top 1/2-inch of the plastic pipe. There should be four holes per row, evenly spaced.
-
Check the flow setting on your pump. Start with the flow setting at the half-way point. You may need to make adjustments after you turn on the pump the first time. Place the pump into the bottom of the watering can and insert the plug through the hole so the cord is outside the can. The pump should sit flat.
-
Insert the drilled out end of the pipe into the brass spigot as far as it will go. Do not bend the pipe or try to force it further than it will go! Insert the bottom part of the pipe into the pump.
-
Fill the can with water and turn on the pump. If the water is coming out with too much force or not enough, turn off the pump, pull it out of the water and adjust the flow setting.
The Drip Cap
- If you've seen the magical watering can fountains and wished you had one, but don't want to spend the high dollars needed to make the purchase, here's your chance to own one for half the price.
- This hole has to be large enough for the plug of the pump to fit through and should be above the maximum water line.
- Fill the can with water and turn on the pump.
- If the water is coming out with too much force or not enough, turn off the pump, pull it out of the water and adjust the flow setting.
Writer Bio
Elizabeth Estabrooks has worked in marketing, social services and technical writing for more than 20 years. Her experience includes writing policy, grants, speeches, federal applications, technical/training manuals, curricula and strategic plans. Estabrooks has also developed marketing documents and fundraising letters.
Photo Credits
- www.alibaba.com
- www.alibaba.com
More Articles


