
Different Floor Height Thresholds

One of the realities of working with a variety of flooring materials is that all of them have different finish heights related to the thickness of the material. Wood, for example, has a very different finish height than ceramic tile.
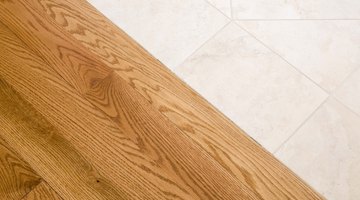
While installation manipulation with padding and underlayment help iron out these inconsistencies, sometimes the only option is to work with a threshold to bridge the gap between the two materials used and make an even transition.
The T-Strip
One way to bridge the gap between two materials is with a T-strip, named so because of its form. The vertical section of the material slips down into the gap between the two different floors, and the horizontal section lies horizontally across the top of each material to each side and hides the transition. Caulking and padding help make up the difference in height from one side to the other, placed on the side of the T-strip which has the lower finish height.
The Ramp
If the height is excessively different, a T-strip is useless and a ramp is installed instead. These are particularly useful in handicap-accessible areas as they provide wheelchair access across an area where there would otherwise be a step or height issue. Ramps are often seen in the case of concrete slabs that are meeting up with another flooring material, such as ceramic tile or a hardwood floor, and are bolted down directly into the floor beneath. Smaller ramp systems are also available for use with tile installations,. They are placed under the edge of the tile, tapering down to the adjacent material.
Reducer Strips
Reducer strips operate in a similar fashion to ramps in that they “reduce” the height from one flooring material to the other. The difference is that rather than being bolted down or installed directly onto the floor beneath, they traditionally install underneath the edge of one of the materials, locking into place. For example, with ceramic tile installations, a reducer strip is normally installed under the last row of tile and locked into place with the mortar that also holds the tile into place, sliding over the top of the hardwood floor or carpet installation that butts up next to the floor. Or, as is the case with tongue-and-groove hardwood floors, it snaps into place with the grooves of the hardwood and then over the top of the adjacent material.
Custom Thresholds
Commercially available thresholds are not always the only solution. Create your own thresholds out of scrap materials on hand, such as taking the natural stone from your floor installation, cutting it on a diagonal and then adding an extra layer of thinset mortar underneath to install a crosswise threshold to match a higher hardwood floor installation. Or use a piece of wood cut down to size to bridge the gap between vinyl and tile and add your own custom edging based on the slope of the ramp you want. If you have access to the right tools, you can create thresholds out of most flooring materials to suit your needs.
The Drip Cap
- One of the realities of working with a variety of flooring materials is that all of them have different finish heights related to the thickness of the material.
- While installation manipulation with padding and underlayment help iron out these inconsistencies, sometimes the only option is to work with a threshold to bridge the gap between the two materials used and make an even transition.
- The difference is that rather than being bolted down or installed directly onto the floor beneath, they traditionally install underneath the edge of one of the materials, locking into place.
- Commercially available thresholds are not always the only solution.
Resources
Writer Bio
Tim Anderson has been freelance writing since 2007. His has been published online through GTV Magazine, Home Anatomy, TravBuddy, MMO Hub, Killer Guides and the Delegate2 group. He spent more than 15 years as a third-generation tile and stone contractor before transitioning into freelance writing.
Photo Credits
- Jupiterimages/Creatas/Getty Images
- Jupiterimages/Creatas/Getty Images
More Articles