
How to Replace a Damaged Ceiling Tile
Maybe an overflowing bathtub or an exploding pot of spaghetti sauce has damaged some ceiling tiles beyond repair. You'll find them easy to replace, especially if they're the suspended type.
Things You Will Need
- 4d Finishing Nails
- Measuring Tape
- Replacement Ceiling Tile(s)
- Nail Set
- Utility Knife With New Blade
- Goggles
- Acrylic Caulk
- Caulking Gun
- Hammer
- Nail Puller Or Pliers
- Panel Adhesive
- Straightedge
- Putty knife, paint scraper or old chisel
Warning
Some ceiling tiles manufactured prior to mid-1970 contain asbestos. Before you work on a ceiling that old, contact your regional EPA office, state environmental office or local health department for advice on testing and handling. See also www.epa.gov/iaq/pubs/asbestos.html. Wear goggles when cutting or handling overhead tiles to protect your eyes from falling dust and fibers.
-
Press up on the tile to pop it out of the track. Lift up the tile and tilt it at an angle as needed to remove it.
-
If the tile is less than full size, use the damaged tile to cut the replacement tile to size with a utility knife guided by a straightedge. Or use a measuring tape to determine the correct size.
-
Reverse the removal procedure to install the tile.
-
Cut out the center of the damaged tile to about 1 inch (2.5 cm) from the perimeter with a utility knife. Make additional cuts perpendicular to each side, up to the joints with adjoining tiles, to remove the remaining pieces.
-
Pull out any nails or staples with a nail puller or pliers, or drive them in flush with a hammer. For tiles installed with adhesive, use a putty knife, paint scraper or old chisel to remove any adhesive residue from the furring strips or the original ceiling (in the absence of furring strips).
-
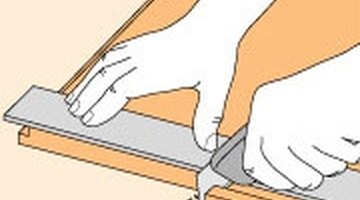
Cut the tongues off the new tile with a utility knife (see A). If you are replacing a partial tile, use a straightedge and a utility knife to cut it to size.
-
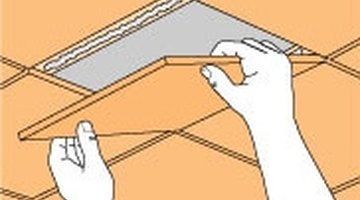
Use a caulking gun to apply panel adhesive to the furring strip (or to put four dabs on the back of the tile if you're attaching it directly to the ceiling). Press the tile into place (see B). Alternatively, nail the tile to the wood strapping with 4d finishing nails, countersink the nails with a nail set and hammer, and fill the holes with acrylic caulk.
The Drip Cap
- Maybe an overflowing bathtub or an exploding pot of spaghetti sauce has damaged some ceiling tiles beyond repair.
- Press up on the tile to pop it out of the track.
- For tiles installed with adhesive, use a putty knife, paint scraper or old chisel to remove any adhesive residue from the furring strips or the original ceiling (in the absence of furring strips).
- If you are replacing a partial tile, use a straightedge and a utility knife to cut it to size.
Writer Bio
This article was written by PocketSense staff. If you have any questions, please reach out to us on our contact us page.
More Articles