
How to Build a Latilla Fence

There are many reasons to build a fence. You may want privacy from the neighbors. You may want noise reduction. You may want to contain your pets or livestock. One fence that will provide all those benefits, and create a rustic Southwestern feeling, is a latilla fence.
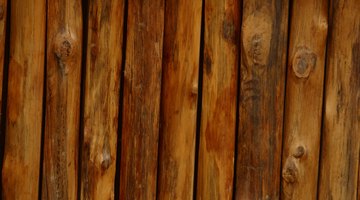
Latilla fences are built from latillas, the trunks of saplings, usually aspen saplings. Ranchers originally built latilla fences to keep coyotes out, but people now often use latilla fences as inexpensive and attractive privacy fences. Latillas have natural variations in color and shape that give them their appeal.
-
Select the sturdiest latillas to serve as cross members. Lay out your fence by driving a stake in the ground where you want it to start and one where you want it to end. Wrap a string around one stake and run it to the other stake to establish a guide for the fence.
-
Dig a 2-foot hole every 7 feet with the posthole digger. Use the string as a guideline to keep the fence straight by digging the holes right next to the strong all along the fence line.
-
Put the 6-inch-diameter, 10-foot-high tree trunks in the holes and backfill around the tree trunks with the dirt you excavated from the holes. Hold each post upright while you fill around it with dirt. Step on the dirt you backfilled the hole with, firming it around the post. The 10-foot-high tree trunks will serve as the support posts for the fence.
-
Nail two latillas between the two posts to create horizontal crossbars. Position one latilla crossbar 1 foot off the ground and another 1 foot from the top.
-
Pull up your stakes and string when you are done building the fence.
-
Line up the latillas along the crossbars forming the body of the fence. Allow the latilla to rest against the dirt. A latilla fence is similar to a stockade fence, with vertical trees forming the main body of the fence. However, stockade fences are made from larger, more uniform trunks than a latilla fence.
-
Predrill holes in each latilla where you will insert the nails to secure the latilla to the crossbars. Predrilling holes for the nails prevents the latilla from splitting when you pound the nail through the latilla into the crossbar. Nail the latilla to the top and bottom crossbar using 3-inch galvanized nails.
Things You Will Need
- 2 stakes
- String
- Post hole digger
- 6-inch-diameter, 10-foot-high tree trunks
- Shovel
- 2-inch-by-8-foot latillas
- Drill
- 3-inch galvanized nails
Tip
If you are trying to exclude coyotes with your latilla fence, dig a 1-foot ditch between the main posts and set the bottom of the latillas in the ditch before nailing them in place. Backfill the ditch with the loose dirt you dug up and tamp the dirt down around the latillas. To determine what size drill bit to use to predrill the holes for the nails, hold the bit next to the nail's shaft and pick the bit that is slightly smaller than the shaft of the nail. Latilla fences are meant to be rustic and imperfect; there will be openings between the latillas, the heights of the latillas will vary, and the fence may not be perfectly straight.
Warning
Tie back loose clothing and hair before operating power equipment. Wear safety goggles when using power equipment.
References
Writer Bio
Writing fanzine-based articles since 1985, Kasandra Rose writes and edits articles for political and health blogs and TrueBloodNet.com and has an extensive technical writing background. She holds a Bachelor of Science in biology and a Bachelor of Arts in anthropology from the University of Michigan, and a Master of Arts in biology from Wayne State University.
Photo Credits
- Jupiterimages/Photos.com/Getty Images
- Jupiterimages/Photos.com/Getty Images
More Articles