
How to Make a Hula Hoop Canopy

A canopy over a bed can make any little girl feel like a princess. However, buying a brand new canopy can make you feel like a pauper. Make this simple canopy from items available at your local department store, and you'll feel like a fairy godmother instead.
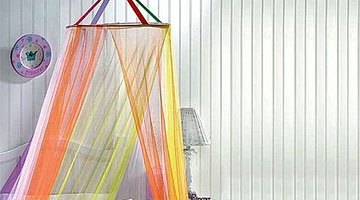
The wonderful thing about this project is that it is completely customizable and can fit the personality of any little girl (or even a bigger girl).
-
Mark the ceiling with a pencil over the top center of the bed, about the mid point of where the pillow would be on a twin bed or in between pillows on a double or queen bed. Drill a pilot hole for the ceiling hook with toggle.
-
Push the folded toggle wings through the pilot hole until they open inside the hollow part of the ceiling. Screw the hook in place, which will tighten the wings inside the ceiling so the hook can't be pulled out if the canopy is yanked on.
-
Lay your canopy material out flat. Fold it once, then fold it again along its width. Measure about 1 to 1-1/2 feet from one end of the fabric and tie it securely with a piece of yarn or ribbon.
-
Hang the fabric from the hook by gathering material that you tied off and tying it to the hook with a double knot. Spread out the bottom of the canopy so it surrounds the bed area, with the opening in the center of the bed.
-
Insert the hula hoop in the center of the canopy, under the fabric, until it is about 18 inches from the knot in the fabric. Glue the hoop in place with your glue gun while a partner holds the hoop in place.
-
Make sure all your knots are tight and the hoop is secure. Add any additional decorations to the canopy (like silk flowers, bows or butterflies) to complete it.
Things You Will Need
- Pencil
- Power drill
- Ceiling hook with toggle
- Hula hoop
- Tulle
- Yarn or ribbon
- Hot glue gun
- Silk flowers, bows, butterflies (optional)
Tip
Use your imagination and be creative. Find a piece of wide ribbon, in a coordinating color, and glue it to the outside of the tulle to cover the hoop.
Warning
Be careful with the hot glue gun.