
How to Install a Foam Quarter-Round Trim

Your most basic molding comes from 1-inch-by-4-inch strips of wood. Using the wood as a baseboard or crown molding creates an elegant touch to a room. Baseboards, however, typically do not sit flush with the floor. Small waves in the floor cause visible gaps. Installing foam or vinyl quarter-round trim allows you to hide or mask those gaps. The quarter-round trim is flexible and bends with the floor. Installation takes only a matter of minutes.
-
Measure and cut the quarter-round trim to the length of the wall using a measuring tape and a miter saw. Most cuts will be straight 90-degree cuts.
-
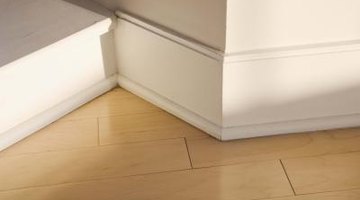
Cut the edge of the trim at 45 degrees for corners. Use an angle finder to verify the corners are 90 degrees. For an odd angle, such as 80 degrees, cut the trim at one-half the measured angle. The example would require a 40-degree cut on the two connecting pieces of trim.
-
Install the trim using an electric nailer and 1 1/2-inch nails. Angle the nailer to shoot the nails into the wall and not the floor. Space your nails approximately 6 to 10 inches apart.
-
Cut a scarf joint for trim that is not long enough to cover an entire wall. A scarf joint is a 30-degree cut into the end of one piece of trim and a corresponding cut into the other piece. The two pieces fit together smoothly hiding the cut. Place a nail through one board into the other.
Tips
- Painting the trim before installing it saves you a lot of effort. You can touch up the paint after installing it using a small paint brush without having to worry about drop cloths and taping.
Photo Credits
- Jupiterimages/Creatas/Getty Images
More Articles