
How to Remove a Broken Valve Stem

Whether on a tire or a faucet, a broken valve stem results in leakage. Replace broken valve stems, as soon as possible. Some specialty tools make the project easier. Keep the old parts around, to identify the correct replacement part later. General terms are applied to both home plumbing and auto tire valve stems.
-
Drain any water or air from the valve. On faucets, turn off the water supply, before turning on the faucet. Open the faucet, until it runs dry.
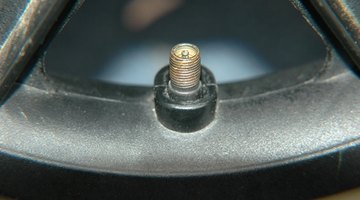
On tires, this means opening the valve cap, by unscrewing it, counterclockwise, and bleeding the air from the tire.
-
Remove any obstructions above the valve stem.
On hose faucets, for example, unscrew the handle, above the valve. Locate the set screw for the handle, and turn it all the way out, counterclockwise, with the screwdriver.
On tires, the cap should already be off, to drain air from the tire.
-
Thread the removal tool onto the valve stem, turning it clockwise all the way down.
Use the segmented, hollow, threaded (female) end to attach the tool to outer (male) threads on the valve stem.
Use the solid, narrow, pointed threaded (male) end to attach the tool to inner (female) threads.
-
Pull out, straight, on the handles of the tool, with your hand, to lift the valve stem out of the socket.
If the tool uses a lever to apply the pulling force, toggle this lever, rather than pulling up on the tool.
-
Unthread the tool from the removed valve stem, turning it counterclockwise. Keep the valve handy, to identify the correct replacement part.

References
Tips
- Some valve stems require specific tools for installation and removal. Refer to the manufacturer's instructions.
- Deflate, and remove, auto tires with pressure monitoring systems from their rims, before removing valve stems.
- A four-way valve stem remover proves more useful than individually sized removers for each valve around the house, as it can be used in many situations.
- Don't despair if a stubborn valve sticks in the socket. Whether on a tire or on a faucet, rust and other material can accumulate around the valve, to make the job more difficult. In these cases, unthreading and rethreading the remover tool a few times may help break away the crud.
- On automobile tires, replace valve stems every time you replace tires.
- On home plumbing, replace valve stems every time you replace faucets.
Warnings
- High air pressure in auto tires, or high water pressure in faucets, can be dangerous. Bleed the valves, before removing them, to drain air or water from the system.
Writer Bio
First published in 2000, Lewis Levenberg writes for journals and blogs across the country. In addition to extensive experience with construction and renovation, he has worked with academic authors on their social media marketing and in retail. His education includes a Master of Arts in communication, culture and technology from Georgetown University.
Photo Credits
- tyre valve image by Warren Millar from Fotolia.com
- water valve image by Wayne Abraham from Fotolia.com
More Articles