
How Does No-Miter Crown Molding Work?

Adding crown molding to any room adds depth and elegance while covering and beautifying the connection between the ceiling and the wall. Moldings have been used since the late Renaissance period and were modeled after Greek and Roman architecture.
Easy Crown Molding
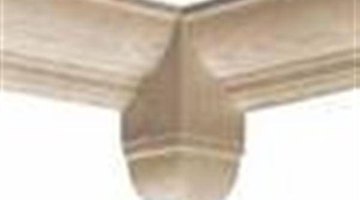
Until recently, crown molding installation has always required an understanding of complex miter angles and cuts. Cutting compound angles is not something the average homeowner feels comfortable trying to do. Many feet of crown molding have been ruined due to wrong angles and bad cuts. Today, the ingenuity of no-miter crown molding eliminates the need for mitered angle cuts by using precut crown molding corners. The corners coordinate with your choice of crown molding and fit exactly into the corners of your room. The molding meets flush with the corners so you only need to use straight cuts on your crown molding.
Choose Your Style
No-miter crown molding comes in a variety of styles and sizes to fit any room décor. The style of your room should dictate your design choice for your molding. Smaller, less formal rooms should have simple, streamlined moldings while the more ornate designs work beautifully in formal rooms. Classic molding styles add sophistication and can make even the smallest rooms seem larger. There are precut corner moldings for inside and outside corners to match whatever design style you choose.
Installing Your Crown Molding
Installing no-miter crown molding can be accomplished in a few steps. First, paint or stain the molding to your preference. It's much easier to coat the molding when it's not already on the wall. Next, add a bit of liquid nail or other similar adhesive to the back of the corner moldings and place them in the ceiling corners of your room. Nail the corner molding in place. Measure the length of the space between the edges of the corner molding on one wall. Trim the wall molding if necessary or add pieces as needed so that you have a close fit on the length of your wall. Use a combination of adhesive and nails to fix the molding to the wall. Now measure the next wall and repeat these steps. It's best to work on one wall at a time and not to assume that a square room will have equally sized walls. An inch or so will make a noticeable difference, so measure and cut as you go. After your installation is finished, fill in any cracks with caulking. You will also want to fill the nail holes, then touch up with paint or stain as needed.
Writer Bio
Katherine Kally is a freelance writer specializing in eco-friendly home-improvement projects, practical craft ideas and cost-effective decorating solutions. Kally's work has been featured on sites across the Web. She holds a Bachelor of Science in psychology from the University of South Carolina and is a member of the Society of Professional Journalists.
Photo Credits
- http://www.hardware.hardwarestore.com
- http://www.hardware.hardwarestore.com
More Articles