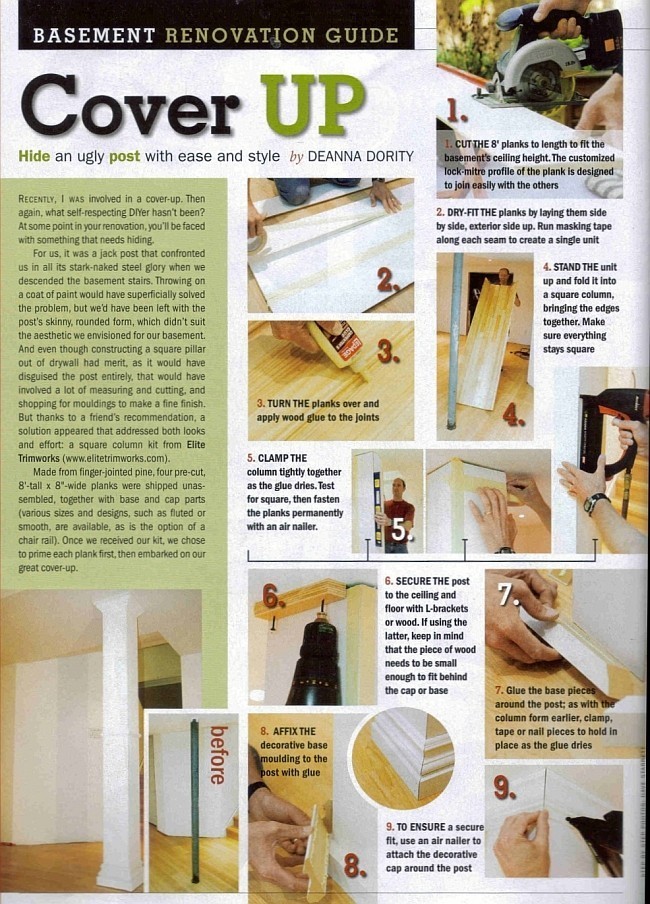
Hand-made columns can be decorative elements on their own, or they can cover existing columns or objects, such as pipes or ducts. This type of column is strictly decorative; it is not structural, or load-bearing. A simple square column typically consists of four boards joined along their side edges to create a hollow structure. If you can build a box, you can build a column.
Essential Item
The biggest challenge when building a column is assembling long pieces of material uniformly along their entire length. Resolve the problem with nylon strap clamps, wrapping the column during assembly to apply pressure equally on all four sides.
Material Choices
The material you choose depends on your application. If your column is under 96 inches in length, medium density fiberboard (MDF) is an affordable, paint-grade material that's easy to work with. Use hardwood plywood for a mid-range column. If the column is over 96 inches in length, use poplar or fir lumber for economy, or hardwood lumber for a high-end look.
Build It
Things You Will Need
-
The width is subject to your needs, but the length should be at least 1/2 inch shorter than needed, so the column has room to clear the ceiling when it's tipped up. (You can use molding to cover the gap after the column is installed.)
-
Cut four pieces of material using a table saw. Tilt the blade to 45 degrees and cut a mitered edge on both long side edges of all four pieces.
-
Place the four pieces across two sawhorses. Add a sheet of plywood across the top to stabilize the workpieces, if desired. If you need access to the bottom side of the workpieces, remove the plywood. Apply glue to the mating edges of two of the column pieces. Place the pieces together to form an L-shape. Shoot 1 1/4-inch pin nails randomly where needed to secure the two pieces together. Use pin nails sparingly. Too many can affect the ability of the clamps to squeeze the pieces together evenly.
-
Assemble the remaining pieces in the same fashion, if you're building a freestanding column. If your column will cover an existing column or other object, complete the assembly with the new column in place around the existing object.
-
Wrap the column with nylon strap clamps placed 12 inches apart. Use a 1/2-inch wrench to tighten the clamps until glue oozes out equally along all four sides. Use a dampened cloth to wipe off excess glue before it dries.
-
After the glue dries, sand the column smooth using 100-grit sandpaper. Finish hardwood items with stain and lacquer or paint. Use paint on MDF, poplar or common fir. Or, optionally, use stain and lacquer on poplar -- you'll be surprised at how good it looks.
Determine the Size
Miter the Sides
Glue and Assemble
Add the Straps
Sand and Finish
Trim It
Columns are typically wrapped with baseboard at the bottom, and quarter-round, cove or crown molding along the top.
Things You Will Need
-
Set the blade of a miter saw to 45 degrees. Cut each piece of baseboard, quarter-round or other molding with a left- and right-hand miter, so the interior width of the board is equal to the width of the column.
-
Apply glue to one piece at a time, and fit it on the column. Shoot 1 1/4-inch pin nails through it at a slight, downward angle to secure it.
Cut the Molding to Fit
Install the Trim
Optional Styling
Shaker, or inset-panel, consists of a frame around the perimeter of columns. If desired, skip the mitered edges on the column assembly, and add a framework of 3/4-by-2-inch lumber around the finished column on all four sides.
The Drip Cap
- Hand-made columns can be decorative elements on their own, or they can cover existing columns or objects, such as pipes or ducts.
- If you can build a box, you can build a column.
- Use hardwood plywood for a mid-range column.
- Tilt the blade](https://thewoodwhisperer.com/articles/fence-position-for-right-tilt-saw/) to 45 degrees and cut a mitered edge on both long side edges of all four pieces.
- Add a sheet of plywood across the top to stabilize the workpieces, if desired.
- After the glue dries, sand the column smooth using 100-grit sandpaper.
- Apply glue to one piece at a time, and fit it on the column.
- Shoot 1 1/4-inch pin nails through it at a slight, downward angle to secure it.
- [