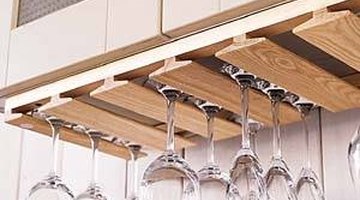
How to Build a Wooden Wineglass Rack
So, you're a wine connoisseur and you need a clever way to display your new wineglasses. Here is just what you need: a simple plan for the wineglass rack that presents many opportunities for personalization. With this plan, you can paint, stain or stencil and set your wineglass rack in a league all its own.

Things You Will Need
- 1 piece of 1-by-12-by-30-inch lumber
- 2 pieces of stemware L molding 12-inches in length
- 6 pieces of stemware T molding 12-inches in length
- Measuring tape
- Framing square
- Variable speed drill
- 1¼-inch screws
- Countersink drill bit
- Philips head screw tip
- Wood glue
Tip
Clean up excess glue immediately as it will affect paint or stain.
Warning
Do not leave power tools unattended.
Do not paint or stain in an unventilated area.
Always wear safety glasses.
-
Sand the wooden parts and paint or stain if you desire. It is easier to do this before you assemble the wineglass rack.
-
Lay the ¾-inch lumber on a table. From one end, measure over 4 7/16-inches and make a mark. From that mark, measure over 4 3/16-inches and make a mark. Repeat the 4 3/16-inch measurement four more times. Place the framing square on the marks and draw a line across the width of the lumber. Measure in from the left and right ends ¼-inch and draw a line.
-
Drill four pilot holes on each line. Space them evenly with the ones on the front and back edges within 1 inch of the edge.
-
Apply glue to the top edges of the mold and center them on the lines you drew in Step 1. Secure the mold to the lumber with the screws. Clean up any access glue with a damp cloth.
-
Lay the wineglass rack on a table, upside down. Measure in 2 inches from the front and back edges in the slots on the left and right sides of the rack and make a mark. Drill pilot holes in these four places. These will be used to install the wineglass rack to the bottom side of a wine rack or a cabinet.
-
Optionally stencil your favorite design on the "L" and "T" molding after you complete Step 5. Hold it with your fingers if tracing the pattern. Or tape stencil to the mold to hold it in place while you apply paintwith a sponge applicator. Apply light coats of paint and remove the stencil before the paint dries.
The Drip Cap
- So, you're a wine connoisseur and you need a clever way to display your new wineglasses.
- Here is just what you need: a simple plan for the wineglass rack that presents many opportunities for personalization.
- From one end, measure over 4 7/16-inches and make a mark.
- Lay the wineglass rack on a table, upside down.
- Or tape stencil to the mold to hold it in place while you apply paintwith a sponge applicator.
Resources
Writer Bio
Michael Straessle has written professionally about the construction industry since 1988. He authored “What a Strange Little Man,” among other books, and his work has appeared in various online publications. Straessle earned a Bachelor of Arts from the University of Arkansas at Little Rock in professional/technical writing.
Photo Credits
- http://images.surlatable.com/surlatable/images/en_US/local/products/detail/179606.jpg
- http://images.surlatable.com/surlatable/images/en_US/local/products/detail/179606.jpg
More Articles


