How to Zero a Dial Caliper

How to Zero a Dial Caliper
Written By
Gene Tencza
Gene Tencza
Published: May 8, 2009
Updated: Nov 20, 2021
1 minute read

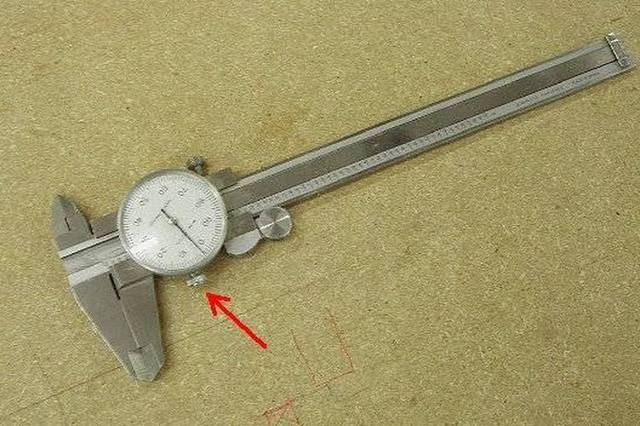
The slightest bit of wear on the moving parts of the dial can throw off the accuracy of the zero setting. Fortunately, a provision is made so that you can easily adjust the zero on your dial caliper.

  1. Be sure that there are no dust or dirt particles between the jaws of the caliper.

  2. Turn the thumb wheel of the caliper until the jaws are completely closed.

  3. Loosen the adjustment lock screw. On this particular caliper (see photo), the screw is pointed out by a red arrow.

  4. Turn the dial until the the hairline indicator (the hand on the dial) is on the zero. It doesn't matter how the orientation of the dial is set.

  5. Tighten the adjustment lock screw. Your caliper will now read correctly when you take a measurement.

The Drip Cap

  • A dial caliper is a measuring instrument with an accuracy rivaling that of a micrometer.
  • Loosen the adjustment lock screw.
  • Your caliper will now read correctly when you take a measurement.

Photo Credits

Photo by Gene Tencza

Photo by Gene Tencza

Gene Tencza

Gene Tencza has worked in the furniture industry all his life. Tencza has always been a chronic home handyman, mechanic and "Jack of all trades". He has been writing professionally for eHow.com since May of 2009. Tencza has a Bachelor of…

Sponsored
HomeSteady Logo

HomeSteady is the ultimate guide for all your household needs, from cleaning and HVAC to electrical, DIY and maintenance.

Property of TechnologyAdvice. © 2026 TechnologyAdvice. All Rights Reserved

Advertiser Disclosure: Some of the products that appear on this site are from companies from which TechnologyAdvice receives compensation. This compensation may impact how and where products appear on this site including, for example, the order in which they appear. TechnologyAdvice does not include all companies or all types of products available in the marketplace.