
How to Replace a Junction Box

The National Electrical Code (NEC) requires certain codes to be followed when installing a junction box. The existing junction box should already meet these requirements. Securely attach the junction box to a stud, rafter or joist. Use wire connectors to secure the wires into the junction box.
The junction box must be covered and remain fully accessible. Junction boxes can not be buried in the walls or ceiling. The conductors, meaning the wires, switches and receptacles must not exceed a specific amount. The required calculations are made using the cubic inches of the box, the connectors and the wires. When installing a switch or receptacle in the box, you must include it in the calculation.
Things You Will Need
- Marker
- Pliers
- Electrical box
- Connectors
- Screws
- Drill
- Screwdriver
- Wire nuts
- Electrical box cover plate
-
Turn the main breaker off in the panel box or, if you know which circuit is in the junction box, turn off the breaker to the circuit.
-
Remove the cover from the junction box you are replacing. Tear off two pieces of masking tape for each connection. Write the number "1" on both pieces. Wrap the tape around both sides of the connection. Write the number "2" on the tape for the next connection. Wrap the tape around both sides of the connection. Follow the same procedure, assigning unique numbers to each connection until all wires are marked. This process will help you when installing the new junction box.
-
Remove all of the wire nuts from all of the connections. Untwist the wires and pull the wires apart. Unscrew the connectors on all of the connectors securing the wire in the junction box. Remove the screws that hold the junction box in place. Pull the junction box loose. Pull the wires out through the connectors.
-
Push out the round knockouts in the sides of the new junction box, only the knockouts needed. Use the old junction box as a guide. Attach the new connectors to the knockouts in the junction box, with the nuts on the inside of the junction box. Use pliers to tighten the nuts on the connectors.
-
Holding the junction box close to the wires, push the wires through the new connectors until the junction box is in the same location as the old junction box. Screw the new junction box in place. Tighten the connectors until the wires are snug in the junction box.
-
Use the masking tape as a guide to connect the wires to make the proper connections. Remove the masking tape as you screw the wire nuts onto the wire connections. Screw the cover to the junction box. Turn on the power at the main panel box.
Warning
Always check and tighten the wire nuts. No uninsulated copper should be exposed, except for the ground wire. This procedure will prevent electric shock injuries and electrical fires.
Always turn the power off to the circuit before working in a junction box. Never work with "live" electricity.
The Drip Cap
- The National Electrical Code (NEC) requires certain codes to be followed when installing a junction box.
- The existing junction box should already meet these requirements.
- Junction boxes can not be buried in the walls or ceiling.
- The required calculations are made using the cubic inches of the box, the connectors and the wires.
- Wrap the tape around both sides of the connection.
- Attach the new connectors to the knockouts in the junction box, with the nuts on the inside of the junction box.
- Use pliers to tighten the nuts on the connectors.
- Screw the cover to the junction box.
References
Writer Bio
Amanda Flanders has been writing since 2007. She received “Rising Star” awards for her articles published in 2010 and is educated in a wide range of home improvement topics and dog care. Flanders holds a certificate in Real Estate Appraisal from the University of Maine, Bangor and is certified in Standard Operating Procedures and Interpreting Animal Behavior for Safe Handling from Human Society University.
Photo Credits
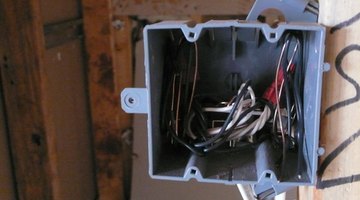
- electrical box image by jimcox40 from Fotolia.com
- electrical box image by jimcox40 from Fotolia.com
More Articles