
How to Install a Shadowbox Fence Panel

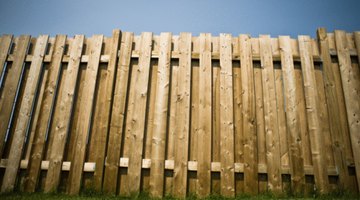
Shadowbox fences are handsome in appearance, offering great curb appeal from the street and plenty of privacy behind the fence. Of course you can build a shadowbox fence from scratch, but if you are short on time but long on the desire to do it yourself, then prefab shadowbox fence panels are the way to go.
With a little planning, you'll find they are rewarding to install.
Things You Will Need
- Prefab shadowbox panels
- Hand posthole digger or automated auger
- Shovel
- Gravel
- Quick-set Concrete
- 4-by-4-by-8-foot treated posts
- Tape measure
- Pencil
- Small nails
- Hammer
- String
- Line level
- Metal square
- Circular saw
- Assorted blocks of wood
- 6-by-6-by-12-inch wood block plus board, 2 1/2 feet
- Box of 8d nails
Tip
Before starting the installation of a fence, talk with your neighbors and explain your plans and why you want to put up a fence.
Warning
Before starting to dig post holes, be sure to call the utility companies to have them come check for underground lines.
-
Dig post holes 8 feet apart and 18 inches deep. Use a hand post hole digger if there aren't many holes to dig. Otherwise, rent an automatic auger from an equipment rental facility.
-
Shovel in about 8 inches of gravel, set the post in and shovel in wet quick-set concrete mix around the post. Set the carpenter's level against one face of the 4-by-4 post to check for plumb -- that the post is straight up and down -- and then place the level against an adjoining face of the 4-by-4 post to again check for plumb. The concrete should start setting up in a minute or two.
-
Measure up from the top of the set concrete to 5 feet 10 inches. Make a mark, then lay the metal square across one face of the 4-by-4 and mark a line. Tap a small nail into the line, tie a string around it and unwind the string while walking down the line of posts. Hook a line level -- a small plastic level that hooks on to the string -- onto the string and move the string up and down until the line level indicates the string is level. Mark a line on the face of the post. Tap a small nail into the post at the line and tie the string taut around the nail.
-
Place the metal square against each post right along the string and draw a line. Turn on the power saw and cut each post off along the line. The posts are now all at the same height.
-
Bring over the first panel of shadowbox fencing and lean it against the first two posts. The three horizontal rail boards that the pickets are nailed to should overlap each post at either end by 2 inches. Lay down the 6-by-6-inch block of wood with a board set at a right angle to create a simple lever and fulcrum. Raise one end of the fence panel up so the top of the picket is 2 inches above the height of the first fence post. Set a block of wood under the bottom of the panel and do the same at the other end.
-
Pound the top rail to the face of the first post. Use just one nail. Lay a carpenter's level along the horizontal top rail. Set up the lever and fulcrum at the opposite end of the panel and step on the piece of board until the fence panel rises to level and nail the rail to the face of the second fence post. Pound in two nails per rail per post.
-
Repeat Steps 5 and 6 the full length of the fence line. Check that each fence panel is level and that each subsequent fence panel is level with the previous one by matching up the ends of the rails and then setting the level straddling the two rails where they meet.
The Drip Cap
- Shadowbox fences are handsome in appearance, offering great curb appeal from the street and plenty of privacy behind the fence.
- With a little planning, you'll find they are rewarding to install.
- Dig post holes 8 feet apart and 18 inches deep.
- The concrete should start setting up in a minute or two.
- Tap a small nail into the line, tie a string around it and unwind the string while walking down the line of posts.
- Lay a carpenter's level along the horizontal top rail.
References
Writer Bio
B. Ellen von Oostenburg became a full-time writer a decade ago. She has written features for local and state newspapers, as well as magazines, including Milwaukee Magazine, Wisconsin Trails and German Magazine. A graduate of the University of Wisconsin - Madison, von Oostenburg holds a Bachelor of Science Degree in fine art.
Photo Credits
- Jupiterimages/Photos.com/Getty Images
- Jupiterimages/Photos.com/Getty Images
More Articles