
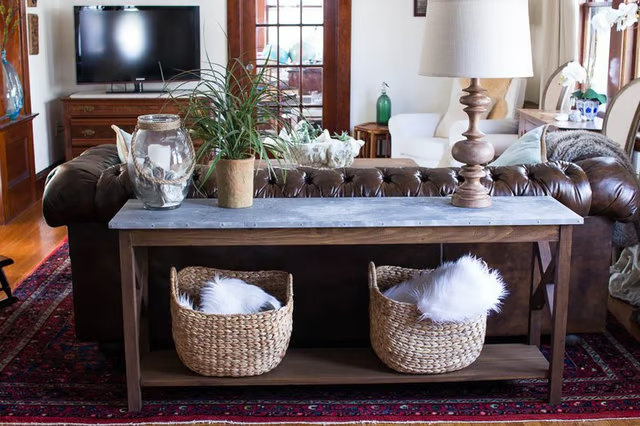
Galvanized metal is a fantastic, versatile look for any home. Stretching real metal over a table can be a hassle, though, which is why learning how to make a table with a faux metal top is a great alternative. It turns out to be surprisingly easy to build an entryway or sofa table with a faux galvanized top if you create the look with paint.
Things You Will Need
-
Use the two 5-foot lengths of the 1x8 and drill 3/8-inch holes 1 inch in from the end, and then about 12-inch centers along one edge of each board, such that they match the holes in the opposite board. It's best to use a dowel jig to ensure the holes are at the same position across the width of the board. Squeeze glue in the holes and spread it along the matching edges of the boards, then insert a dowel joint in each hole. Clamp the two pieces together and leave overnight to dry. Sand the surface smooth.
-
Cut two 9 1/2-inch lengths of the 1 x 3 and two 54 3/4-inch lengths of the 1x3 using your miter saw. Use the Kreg Jig to create pocket holes in each end of each length. On the shorter lengths, add pocket holes approximately 2 inches in from the end (along one edge). On the longer lengths, add pocket holes along one edge 2 inches in from the end and spaced 12 inches on center.
-
Position the boards on the underside of the table top, 1 1/4-inch from the edge, with all the pocket holes facing the inside. Make sure each board is centered along the length. Attach to the top with the Kreg screws.
-
Cut each of the four 2x2s to your desired height. For this project, the legs are 25 1/4 inches.
-
Stand the legs on the underside of the table, butting into the skirt. Clamp and screw from inside of the skirt with Kreg screws. Screw through the pocket holes.
-
Cut four pieces of 2x2 at 45-degree angles so both sides are 13 1/2-inches long. Mark two lines across each piece, 3/4 inches from the center. The lines should be square to the edge of the wood. These sections will be cut halfway through to join two pieces together to create the cross trim.
-
Cut along the lines you've made and then several areas in between them to a 3/4-inch depth. Using either a chisel or miter saw, remove sections of wood to make a channel. Apply wood glue in the channels and press the boards together to make an X. Use the drill bit from the Kreg Jig to create countersunk holes where the X will attach to the legs. Attach to the legs with Kreg screws.
-
Cut the 1x12 to 56 3/4 inches. Cut 1" squares out of each corner, using a jigsaw. Attach shelf clips to desired height on your legs by pre-drilling holes. For added stability, use screws to attach to the brackets (wait to affix the shelf until after staining painting). The table is built.
-
Sand all surfaces with a medium-grit sanding block. Wipe off all sanding dust.
-
General Finishes Gel Stain makes finishing surfaces quick and easy. Apply gel stain with either a brush or rag, and use a rag to wipe off excess stain.
-
Note: It is easier to stain with the table upside down. For the shelf, apply stain to both sides (allow it to dry before flipping it over). Allow the stain to dry 24 hours before applying your desired top coat. Wipe-On Poly is an easy-to-apply oil-based finish. Wipe it on with a rag. Apply two coats for added protection.
-
Galvanized metal is nailed in place on tabletops. To create this look it is important to use something that looks like these nails. You could use carpet tacks, thumbtacks or other nails. Pre-drill holes and lightly hammer the tacks in place.
-
Brush on two coats, allowing the paint to dry between coats. Be sure to paint over the tacks, as well.
-
Take your two gray paints (Sterling and Soap Stone), pour a little into cups and add water. Mix together. It is important to work in sections. Use a foam brush to apply some of each paint, then spritz the paint with water and immediately blot with a paper towel.
-
Fusion Mineral Paint has a top coat built in so there is no need to add a top coat, but you could add their wax or tough coat for added protection.
-
Add the same effect along the edge. Apply the two colors and spritz. It is helpful to work in sections, placing a piece of paper towel under the edge of the top (to prevent paint from getting on the stained underside). Apply the same technique as above, blot and allow to dry.
Create the Top of the Table
Add the Table Skirt
Attach the Table Legs
Create the Cross Trim on the Legs
Build and Attach the Shelf
Prep the Table Surface for Stain and Paint
Stain the Table and Apply a Protective Top Coat
Add Tacks Around the Tabletop Edge
Paint the Table with Metallic Paint
Create a Faux Galvanized Finish
Add a Galvanized Effect Along the Edge
Check out this related video.