
How to Do a Roofing Layover

It is an acceptable practice to add a second roof layer to an existing asphalt shingled roof provided that the roof structure is sound and has the ability to support the additional weight. The layover process is identical to installing shingles on a bare roof with the exception of trimming the starter shingles of the first and second row. This is a necessary step when adding new shingles to existing shingles to ensure that the appearance of the roof is flat and uniform.

-
Repair any leaking areas of the existing roof before installing new shingles.
-
Inspect the roof deck for damaged areas. Make any necessary repairs to the decking. Drive any protruding nail heads back down with the hammer. Remove any damaged or buckling shingles with the hammer and pry bar. Replace damaged shingles with scrap pieces of shingle.
-
Remove the shingles of the ridge cap using the hammer and pry bar. The ridge cap is a row of shingles that is installed along the top or peak of the roof where the two sides meet.
-
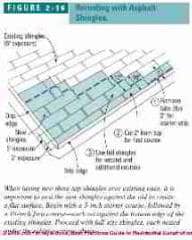
Measure 12 inches up from the drip edge. The drip edge is the L-shaped flashing installed along the eaves of the roof to direct water into the gutters. Remove 2 inches from the bottom edge of the existing shingles with the roofing knife to allow easier application of the new starter shingles.
-
Sweep all debris from the roof with the push broom.
-
Trim the new shingles of the first row to 5 inches. This will prevent excess thickness of the first row of new shingles, ensuring that the roof will lay flat. Trim the new shingles of the second row to 10 inches.
-
Remove the black tabs from the first row of 5-inch starter shingles.
-
Lay the first 5-inch starter shingle flat against the existing shingle at the beginning of the eave. Hammer three 2-inch roofing nails evenly spaced 3/4-inch above the pre-determined tab line on the shingle. Continue laying and nailing shingles flat against the existing shingles until the row has been completed.
-
Lay the bottom edge of the first 10-inch shingle flush against the bottom edge of the 5-inch starter shingle. The bottom of the 5-inch shingle is flush with the edge of the roof. The object is to position the new shingles flush against the old shingles, eliminating staggered lines, to create a flat surface for the start of the new roof. After the completion of the first two rows, shingling should proceed normally. Hammer four 2-inch roofing nails in evenly spaced intervals 3/4-inch above the pre-determined tab line. Continue laying and nailing shingles flat against the previously installed shingles until the row has been completed.
-
Lay the bottom edge of the first 12-inch shingle against the bottom edge of the tab line of the previously installed 10-inch shingle. Hammer four 2-inch roofing nails in evenly spaced intervals 3/4-inch above the pre-determined tab line. Continue laying and nailing shingles flat against the previously installed shingles until the row has been completed.
-
Go to the opposite side of the roof and repeat steps 6, 7, 8, 9 and 10.
-
Cut each three-tab shingle into three pieces at the marked tab lines with the roofing knife. Each shingle has a colored or granulated section and a black tar papered section. Trim the top outer corners of the black section at a 45 degree angled cut. Angled corners will join together neater on the ridge or peak of the roof.
-
Snap a chalk line on one side of the ridge, 6 inches down and parallel to the peak of the roof with the chalk box. This line is the guide line for shingle placement.
-
Align the edge of the first shingle with the chalk line. Lay it over the ridge or peak of the roof. The black tar paper of the angled end should be pointing toward the center of the ridge. Hammer four 1 1/4-inch roofing nails 1 inch from the four edges of the granulated piece of the shingle. Caulk the heads of the two nails at the roof edge with the caulking gun. Apply a generous bead of caulk under the edge of the starter shingle to prevent wind from entering.
-
Align the next shingle with the chalk line. Lay the second shingle over the first shingle 1 inch below the black tar line, covering 1 inch of the granulated area of the first shingle. This should leave a 5 inch reveal on the granulated area of the shingle. Hammer one 2-inch roofing nail into each of the two corners of the leading edge of the granulated portion of shingle. These two nails will secure the tar-papered end of the previously installed shingle to the roof.
-
Repeat step 4 to install shingles along the ridge line until you reach the center of the ridge cap. When you reach the center stop and go the the opposite end of the ridge.
-
Repeat steps 14 and 15 from the opposite end.
-
Repeat step 7 to install ridge cap shingles along the ridge line until you reach the center of the ridge cap. Lay the final shingle to complete the ridge cap. Caulk the nail heads.
References
Resources
Tips
- Measure the existing shingles. Purchase new shingles of the same size and shape.
- If new metal flashing is desired, remove all existing flashing material and replace before applying new shingles.
- Standard three-tab shingles are 12-inches wide.
- The first row will only have a 3-inch reveal as opposed to the normal 5-inch reveal. The shingles of the first two rows are trimmed down to fit over the existing shingles.
- Trim the shingles to fit in valleys and at the rake edge of the roof.
Writer Bio
Mona Culberson began working on the assembly line at a large manufacturing company in 1983, where she worked her way up into several positions of business responsibility. In 2005, she began a career in roofing, interior design and remodeling. She works daily as a professional painter/home remodeler/handywoman while lending her husband's roofing business a helping hand in her spare time.
Photo Credits
- Damaged Roofs image by Craig Hanson from Fotolia.com
More Articles